Achieving Sonic Perfection: A Guide to Soft Rock Acoustic Mic Placement
Capturing the warmth and intimacy of acoustic instruments in soft rock requires more than just a good microphone. The art of soft rock acoustic mic placement is a delicate dance between physics, acoustics, and artistic intention. Whether you’re a seasoned audio engineer or a budding home recordist, mastering mic placement is crucial for achieving a professional, polished sound. This comprehensive guide will delve into the techniques, considerations, and best practices for capturing stunning acoustic tones, tailored specifically for the soft rock genre. We’ll explore the nuances of different microphone types, optimal placement strategies, and how to overcome common recording challenges. Prepare to elevate your recordings and unlock the true potential of your acoustic instruments.
Understanding the Fundamentals of Acoustic Mic Placement
Before diving into specific techniques, it’s vital to grasp the core principles that govern acoustic mic placement. These principles dictate how sound waves interact with microphones, ultimately shaping the recorded tone. Understanding these fundamentals allows you to make informed decisions and adapt your approach to different instruments, recording environments, and desired sonic characteristics.
Proximity Effect and its impact
The proximity effect is a phenomenon primarily associated with directional microphones, particularly cardioid mics. As the microphone gets closer to the sound source, the bass frequencies become increasingly emphasized. This can be a desirable effect for adding warmth and fullness to vocals or instruments, but it can also lead to a muddy or boomy sound if not carefully managed. Understanding the proximity effect allows you to use distance strategically to shape the low-end response of your recordings.
Polar Patterns: Choosing the Right Mic for the Job
A microphone’s polar pattern describes its sensitivity to sound from different directions. Cardioid microphones are most sensitive to sound from the front, rejecting sound from the rear. Omnidirectional microphones pick up sound equally from all directions. Figure-8 microphones pick up sound from the front and rear, rejecting sound from the sides. The choice of polar pattern depends on the recording environment, the desired amount of ambience, and the need to isolate the sound source. For soft rock acoustic recordings, cardioid microphones are often preferred for their ability to reject unwanted noise and focus on the instrument’s direct sound. However, omnidirectional mics can be useful for capturing a more natural and spacious sound in a well-treated room.
Room Acoustics and Their Influence
The acoustics of your recording space play a significant role in the final sound. Reflections from walls, ceilings, and floors can create unwanted coloration and comb filtering. Ideally, a recording space should be acoustically treated to minimize these reflections. This can be achieved through the use of acoustic panels, bass traps, and diffusers. However, even in untreated rooms, careful mic placement can help minimize the impact of poor acoustics. Experiment with different microphone positions and angles to find the sweet spot where the instrument sounds its best.
Microphone Selection for Soft Rock Acoustic Recordings
The choice of microphone is paramount in capturing the nuances of acoustic instruments. While personal preference plays a role, some microphone types are better suited for specific instruments and genres. For soft rock acoustic recordings, condenser and ribbon microphones are generally favored for their sensitivity and ability to capture subtle details.
Condenser Microphones: Capturing Detail and Clarity
Condenser microphones are known for their wide frequency response, high sensitivity, and ability to capture transient details. They are a popular choice for recording acoustic guitars, vocals, and other instruments that require a detailed and accurate representation. Large-diaphragm condenser microphones are often preferred for their warm and full sound, while small-diaphragm condensers excel at capturing a more natural and transparent tone.
Ribbon Microphones: Warmth and Smoothness
Ribbon microphones are prized for their warm, smooth, and vintage sound. They tend to roll off high frequencies, which can be beneficial for taming harsh or brittle sounds. Ribbon microphones are particularly well-suited for recording acoustic guitars, vocals, and horns in soft rock productions. They can add a touch of classic character and warmth to your recordings.
Dynamic Microphones: Rugged and Versatile
While not as commonly used as condenser or ribbon microphones for acoustic recordings, dynamic microphones can still be useful in certain situations. They are known for their ruggedness, high SPL handling, and ability to reject background noise. Dynamic microphones can be a good choice for recording drums, percussion, and amplifiers in a live setting.
Strategic Mic Placement Techniques for Acoustic Instruments
Now, let’s delve into specific mic placement techniques for various acoustic instruments commonly used in soft rock music. These techniques are designed to capture the instrument’s natural tone while minimizing unwanted noise and reflections. Remember to experiment and adjust these techniques to suit your specific recording environment and desired sonic characteristics.
Acoustic Guitar Mic Placement: Finding the Sweet Spot
Recording acoustic guitar effectively is crucial for soft rock. Here are a few options.
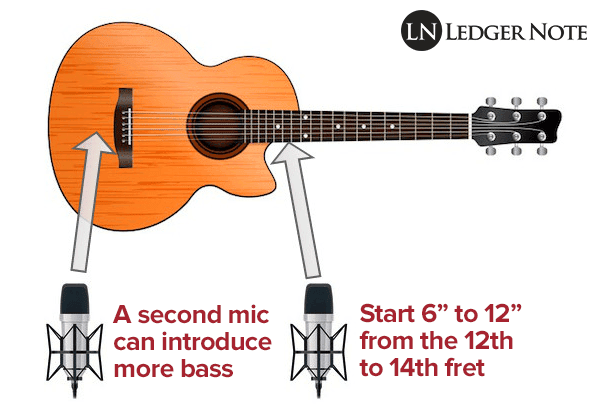
- The 12th Fret Method: Position the microphone 6-12 inches away from the guitar, pointing towards the 12th fret. This technique captures a balanced blend of the body and neck of the guitar.
- The Body Method: Place the microphone 4-8 inches away from the lower bout of the guitar, near the soundhole. This technique emphasizes the body’s resonance and warmth. Be careful to avoid placing the microphone directly in front of the soundhole, as this can result in a boomy or muffled sound.
- The Stereo Pair Method: Use two microphones to capture a wider and more spacious sound. One microphone can be placed near the 12th fret, while the other is positioned near the bridge. Experiment with different microphone types and distances to find the ideal stereo image.
Piano Mic Placement: Capturing the Grandeur
Recording piano, especially in a soft rock context, demands capturing its full range and dynamics.
- The XY Stereo Technique: Place two cardioid microphones close together, with their capsules angled at 90 degrees. This technique provides a focused and coherent stereo image.
- The ORTF Stereo Technique: Place two cardioid microphones 17 cm apart, with their capsules angled at 110 degrees. This technique creates a wider and more spacious stereo image.
- The Spaced Pair Technique: Place two omnidirectional microphones several feet apart, on either side of the piano. This technique captures the full width of the instrument and provides a natural and spacious sound.
Acoustic Drum Mic Placement: Emphasizing Nuance
While soft rock often features subtle drumming, capturing acoustic drums well is still important.
- Overhead Microphones: Use two overhead microphones to capture the overall sound of the drum kit. These microphones should be positioned several feet above the kit, pointing downwards.
- Close Microphones: Place individual microphones on each drum and cymbal to capture their specific sound. This allows for greater control over the mix and enables you to create a more detailed and punchy drum sound.
- Room Microphones: Use one or two room microphones to capture the ambience of the recording space. These microphones should be placed several feet away from the drum kit, pointing towards the walls or corners of the room.
Advanced Techniques for Refining Your Acoustic Recordings
Once you’ve mastered the basic mic placement techniques, you can explore more advanced strategies to further refine your acoustic recordings. These techniques involve using specialized equipment, experimenting with different microphone combinations, and paying close attention to the details of your recording environment.
Using Acoustic Treatment to Improve Sound
Acoustic treatment is essential for creating a professional-sounding recording space. Acoustic panels, bass traps, and diffusers can help minimize unwanted reflections, reduce standing waves, and create a more balanced and controlled sound. Investing in acoustic treatment can significantly improve the quality of your acoustic recordings.
Experimenting with Microphone Combinations
Don’t be afraid to experiment with different microphone combinations to find the perfect sound for your acoustic instruments. Try using a condenser microphone for the main sound and a ribbon microphone for warmth, or a dynamic microphone for punch and a condenser microphone for detail. The possibilities are endless.
Paying Attention to Phase
Phase is a critical factor in multi-microphone recordings. When two or more microphones pick up the same sound source, their signals can interfere with each other, resulting in comb filtering and a loss of clarity. To minimize phase issues, ensure that the microphones are equidistant from the sound source, or use a phase alignment tool to correct any timing differences.
The Importance of Preamp Selection in Acoustic Recording
While mic placement is critical, the preamp you use to amplify the microphone signal also significantly impacts the final sound. Different preamps impart different sonic characteristics, and choosing the right preamp can complement the microphone and instrument, resulting in a richer and more pleasing recording.
Solid-State Preamps: Clean and Transparent
Solid-state preamps are known for their clean, transparent, and accurate sound. They tend to have a wide frequency response and low distortion, making them a good choice for recording acoustic instruments that require a detailed and uncolored representation.
Tube Preamps: Warm and Harmonically Rich
Tube preamps are prized for their warm, harmonically rich, and vintage sound. They tend to add a subtle coloration to the signal, which can be pleasing on acoustic instruments. Tube preamps are often used to add warmth and character to vocals, guitars, and drums.
Transformer-Based Preamps: Punchy and Defined
Transformer-based preamps are known for their punchy, defined, and slightly colored sound. They tend to add a subtle compression and saturation to the signal, which can be beneficial for adding energy and excitement to acoustic recordings. Transformer-based preamps are often used on drums, bass, and electric guitars.
Real-World Examples and Use Cases
Let’s look at some practical examples of how these mic placement techniques can be applied in real-world recording scenarios. These examples will illustrate how to adapt your approach to different instruments, recording environments, and desired sonic characteristics.
Recording an Acoustic Ballad
For a soft rock ballad, you might want to capture a warm and intimate sound. Try using a large-diaphragm condenser microphone placed 6-12 inches away from the 12th fret of the acoustic guitar. Pair this with a ribbon microphone placed slightly off-axis to the singer’s mouth to capture a smooth and natural vocal performance.
Recording an Upbeat Acoustic Song
For a more upbeat acoustic song, you might want to capture a brighter and more energetic sound. Try using two small-diaphragm condenser microphones in an XY configuration to record the acoustic guitar. Use a dynamic microphone on the snare drum and a condenser microphone on the kick drum to capture a punchy and defined drum sound.
Recording a Live Acoustic Performance
When recording a live acoustic performance, it’s essential to minimize bleed and feedback. Try using cardioid microphones on all instruments and vocals. Position the microphones as close as possible to the sound sources, while still maintaining a natural and balanced sound. Use a gate on each channel to reduce unwanted noise and bleed.
Troubleshooting Common Mic Placement Issues
Even with careful planning and execution, you may encounter some common mic placement issues. Here are some tips for troubleshooting these problems:
- Boomy Sound: Move the microphone further away from the sound source, or try using a high-pass filter to reduce the low-frequency content.
- Harsh Sound: Try using a ribbon microphone or rolling off the high frequencies with an EQ.
- Lack of Detail: Use a condenser microphone or move the microphone closer to the sound source.
- Phase Issues: Check the phase alignment of the microphones and adjust their positions accordingly.
The Art of Experimentation: Finding Your Signature Sound
Ultimately, the best mic placement techniques are the ones that work best for you. Don’t be afraid to experiment and try new things. The more you experiment, the more you’ll learn about how different microphones and placements affect the sound of your acoustic instruments. With practice and patience, you’ll develop your own signature sound and become a master of acoustic mic placement.
From Studio to Stage: Adapting Mic Placement for Live Performances
While many of the principles of mic placement remain consistent whether you’re in the studio or on stage, the live environment presents unique challenges. Feedback, stage noise, and the need for quick setup and teardown require a modified approach. Durability, ease of use, and feedback rejection become paramount.
Dynamic microphones, known for their ruggedness and ability to handle high sound pressure levels, are often the workhorses of live sound. Cardioid polar patterns are crucial for minimizing feedback by rejecting sound from the rear of the microphone, where stage monitors are typically positioned. Consider using clip-on microphones for acoustic guitars, allowing the performer to move freely without sacrificing sound quality. For vocals, a dynamic microphone with excellent off-axis rejection is essential for cutting through the mix and minimizing bleed from other instruments.
Elevate Your Sound
Mastering soft rock acoustic mic placement is a journey that blends technical knowledge with artistic intuition. By understanding the fundamentals of acoustics, exploring different microphone types, and experimenting with various placement techniques, you can unlock the full potential of your acoustic instruments and create recordings that are both warm and captivating. So, grab your microphones, experiment with different positions, and discover the sweet spot that brings your soft rock visions to life. Share your recording experiences and favorite mic placement tips in the comments below!
