
Unlock Pro Sound: Your DIY Guitar Lesson Recording Setup Guide
Want to record professional-sounding guitar lessons from the comfort of your own home? It’s more achievable than you think! Creating a high-quality diy guitar lesson recording setup doesn’t require a fortune. This comprehensive guide will walk you through every step, from selecting the right equipment to mastering essential recording techniques, helping you produce lessons that sound amazing and keep your students engaged. We’ll cover everything from the basics to some more advanced tips to ensure you’re equipped for success. Whether you’re a seasoned instructor or just starting out, this guide will empower you to create top-notch guitar lesson recordings that stand out.
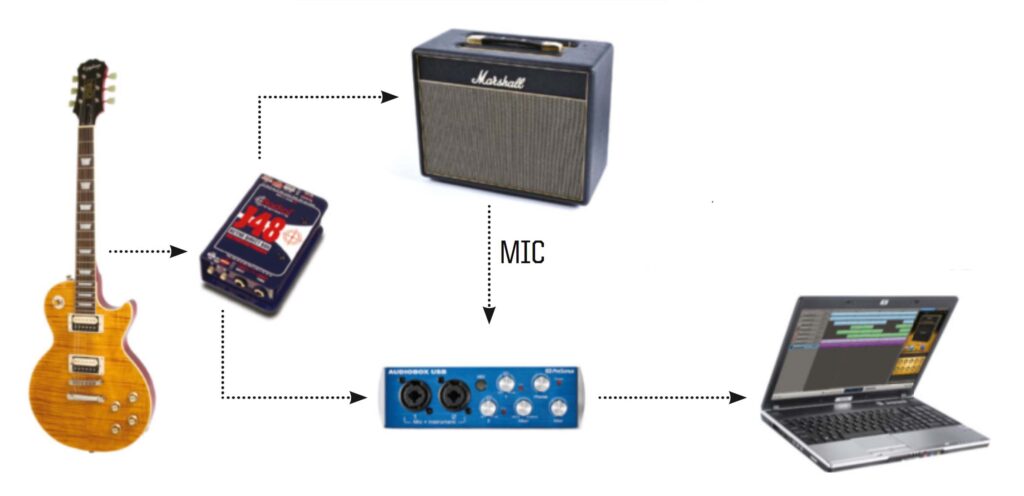
Essential Gear for Your Home Guitar Recording Studio
Building a diy guitar lesson recording setup starts with the right equipment. Let’s break down the essentials:
- Computer: A reliable computer (Windows or Mac) is the heart of your setup. Ensure it meets the minimum system requirements of your chosen recording software. A faster processor and ample RAM (at least 8GB, ideally 16GB) will prevent frustrating lags and crashes.
- Digital Audio Workstation (DAW): This is your recording software. Popular options include Audacity (free and beginner-friendly), GarageBand (free for Mac users), Ableton Live, Logic Pro X, and Pro Tools. Each DAW has its own strengths and learning curve.
- Audio Interface: This crucial piece of gear connects your guitar and microphone to your computer. It converts analog signals into digital signals that your computer can understand. Look for an interface with at least one or two XLR inputs for microphones and a ¼-inch input for your guitar. Focusrite Scarlett interfaces are a popular choice for beginners.
- Microphone: For recording acoustic guitar and vocals, a condenser microphone is generally preferred. For electric guitar, you can use a dynamic microphone or a condenser microphone (often placed near the amplifier). Consider a Shure SM57 (dynamic) for electric guitar amps or an Audio-Technica AT2020 (condenser) for acoustic guitar and vocals.
- XLR Cable: You’ll need an XLR cable to connect your microphone to your audio interface.
- Guitar Cable: A high-quality guitar cable is essential for connecting your guitar to your audio interface.
- Headphones: Closed-back headphones are ideal for recording because they prevent sound leakage into the microphone. Beyerdynamic DT 770 Pro or Sennheiser HD280 Pro are excellent choices.
- Studio Monitors (Optional): While headphones are essential for recording, studio monitors (speakers designed for accurate audio reproduction) are beneficial for mixing and mastering. However, they are not strictly necessary for recording guitar lessons.
- Microphone Stand: A sturdy microphone stand is crucial for positioning your microphone correctly.
- Pop Filter (for Vocal Mics): A pop filter reduces plosives (bursts of air from ‘p’ and ‘b’ sounds) when recording vocals.
- Acoustic Treatment (Optional but Recommended): Treating your recording space with acoustic panels or foam can significantly improve the sound quality by reducing unwanted reflections and reverberation.
Choosing the Right DAW for Guitar Lesson Recording
Your Digital Audio Workstation (DAW) is the central hub of your diy guitar lesson recording setup. Selecting the right one depends on your budget, experience level, and specific needs. Here’s a closer look at some popular options:
- Audacity: A free, open-source DAW that’s perfect for beginners. It offers basic recording, editing, and mixing capabilities. While it may lack some advanced features, it’s a great starting point for learning the fundamentals.
- GarageBand: Free for Mac users, GarageBand is a user-friendly DAW with a wide range of instruments and effects. It’s a step up from Audacity and offers more advanced features like virtual instruments and MIDI editing.
- Ableton Live: A powerful DAW known for its intuitive workflow and real-time performance capabilities. It’s popular among electronic musicians but also suitable for recording guitar and other instruments. Ableton Live has a steeper learning curve but offers a wealth of advanced features.
- Logic Pro X: Apple’s professional-grade DAW, Logic Pro X, offers a comprehensive suite of tools for recording, editing, mixing, and mastering. It’s a popular choice among professional musicians and recording engineers.
- Pro Tools: The industry-standard DAW, Pro Tools, is used in countless recording studios worldwide. It offers unparalleled features and capabilities but also comes with a higher price tag and a steeper learning curve.
Consider your budget, desired features, and learning curve when choosing a DAW. Start with a free or affordable option and upgrade as your needs evolve.
Optimizing Your Recording Space for Superior Sound
The acoustics of your recording space play a significant role in the quality of your diy guitar lesson recording setup. Uncontrolled reflections and reverberation can muddy your recordings and make them sound unprofessional. Here’s how to optimize your space:
- Acoustic Treatment: Adding acoustic panels or foam to your walls and ceiling can absorb sound waves and reduce reflections. You can purchase pre-made panels or build your own using materials like mineral wool or fiberglass.
- Placement: Experiment with microphone placement to find the sweet spot in your room. Avoid placing the microphone near walls or corners, as these areas tend to amplify unwanted reflections.
- Soft Furnishings: Adding soft furnishings like rugs, curtains, and blankets can also help to absorb sound waves.
- Isolation: If possible, record in a small, enclosed space like a closet or vocal booth. This will help to isolate the sound and minimize external noise.
Even simple steps like closing windows and doors can make a noticeable difference. Remember, the goal is to create a dry, controlled sound environment that minimizes unwanted reflections and reverberation.
Microphone Techniques for Recording Guitar Lessons
Proper microphone technique is crucial for capturing a clean, clear guitar sound. Here are some tips for recording both acoustic and electric guitar:
Recording Acoustic Guitar
- Microphone Placement: Experiment with different microphone positions to find the sweet spot. A common starting point is to place the microphone 6-12 inches away from the guitar, pointing towards the 12th fret.
- Polar Pattern: Use a cardioid polar pattern to reject sound from the sides and rear of the microphone.
- Distance: Adjust the distance between the microphone and the guitar to control the amount of proximity effect (bass boost).
- Room Sound: Be mindful of the room sound. If your room is too reverberant, try moving the microphone closer to the guitar or adding acoustic treatment.
Recording Electric Guitar
- Amplifier: Use a good-sounding amplifier that is appropriate for the style of music you are recording.
- Microphone Placement: Place the microphone close to the speaker cone, slightly off-axis. Experiment with different microphone positions to find the best tone. A Shure SM57 is a common choice for recording electric guitar amps.
- Multiple Microphones (Optional): Consider using two microphones to capture different aspects of the amplifier’s tone. For example, you could use one microphone close to the speaker cone and another microphone further away to capture the room sound.
- Direct Input (DI): You can also record the guitar signal directly into your audio interface using a DI box. This will give you a clean, uncolored signal that you can then process with amp simulation software.
Experimentation is key. Listen carefully to the recorded sound and adjust your microphone technique accordingly.
Setting Up Your Audio Interface for Optimal Recording
Your audio interface is the bridge between your guitar and your computer. Setting it up correctly is essential for achieving optimal recording quality. Here’s a step-by-step guide:
- Install Drivers: Install the drivers for your audio interface. These drivers allow your computer to communicate with the interface.
- Connect Interface: Connect your audio interface to your computer via USB or Thunderbolt.
- Configure DAW: In your DAW’s settings, select your audio interface as the input and output device.
- Set Input Levels: Adjust the input gain on your audio interface so that the signal is strong but not clipping (distorting). Aim for a peak level of around -12dBFS.
- Monitor Signal: Use the direct monitoring feature on your audio interface to listen to your guitar signal without latency (delay).
- Phantom Power: If you are using a condenser microphone, enable phantom power (+48V) on your audio interface.
Consult your audio interface’s manual for specific instructions on setting it up correctly.
Mastering the Art of Gain Staging for Professional Results
Gain staging is the process of optimizing the signal level at each stage of your recording chain. Proper gain staging ensures that your recordings are clean, clear, and free from noise and distortion. Here’s how to do it:
- Start at the Source: Begin by setting the gain on your guitar or amplifier. Aim for a strong signal without clipping.
- Audio Interface: Adjust the input gain on your audio interface to achieve a healthy signal level (around -12dBFS).
- DAW: In your DAW, adjust the levels of your tracks so that they are balanced and not clipping.
- Plugins: When using plugins, be mindful of their input and output levels. Avoid overloading plugins, as this can introduce distortion.
- Master Bus: On your master bus, aim for a peak level of around -6dBFS to leave headroom for mastering.
Consistent gain staging will improve the overall sound quality of your recordings and make the mixing process much easier.
Essential Editing Techniques for Polished Guitar Lessons
Editing is an essential part of the recording process. It allows you to clean up your recordings, remove mistakes, and create a polished final product. Here are some essential editing techniques for guitar lessons:
- Cutting and Trimming: Use the cut and trim tools to remove unwanted sections of audio, such as silence or mistakes.
- Crossfades: Use crossfades to create smooth transitions between different sections of audio.
- Noise Reduction: Use noise reduction plugins to remove unwanted background noise, such as hum or hiss.
- Compression: Use compression to even out the dynamics of your recordings and make them sound more punchy.
- EQ: Use EQ to shape the tonal balance of your recordings and remove unwanted frequencies.
- Time Stretching and Pitch Shifting: Use time stretching and pitch shifting to correct timing and pitch errors.
Experiment with different editing techniques to find what works best for you. Remember, the goal is to create a clean, polished recording that is easy to listen to.
Mixing and Mastering Your Guitar Lessons for a Professional Sound
Mixing and mastering are the final steps in the recording process. Mixing involves blending all of the different tracks together to create a cohesive sound. Mastering involves optimizing the overall loudness and tonal balance of the recording.
Mixing Tips
- Balance: Adjust the levels of each track so that they are balanced and sit well together.
- Panning: Use panning to create a sense of space and separation in the mix.
- EQ: Use EQ to shape the tonal balance of each track and remove unwanted frequencies.
- Compression: Use compression to even out the dynamics of each track and make them sound more punchy.
- Reverb and Delay: Use reverb and delay to add space and depth to the mix.
Mastering Tips
- Loudness: Optimize the overall loudness of the recording to make it competitive with other commercially released music.
- EQ: Use EQ to make subtle adjustments to the overall tonal balance of the recording.
- Compression: Use compression to glue the mix together and add punch.
- Limiting: Use a limiter to prevent the recording from clipping and maximize its loudness.
Mixing and mastering are complex processes that require a lot of practice and experience. Consider hiring a professional mixing and mastering engineer if you want to achieve the best possible results. Many online services offer affordable mixing and mastering services.
The Value of Investing in a Quality Guitar Lesson Recording Setup
Investing in a well-equipped diy guitar lesson recording setup offers numerous advantages. First and foremost, it allows you to create high-quality lessons that sound professional and engaging. This, in turn, can attract more students and enhance your reputation as an instructor. High-quality audio also improves the learning experience for your students, making it easier for them to hear and understand your instructions. Moreover, a good recording setup provides you with the flexibility to create lessons on your own schedule and at your own pace. You’re not limited by studio availability or the constraints of a traditional classroom setting. Finally, recording your lessons allows you to build a valuable library of content that you can repurpose and sell online. Users consistently report a significant increase in student engagement and satisfaction when presented with professionally recorded lessons.
Crafting Engaging Guitar Lessons: Content is Still King
While a great diy guitar lesson recording setup is essential, remember that the quality of your content is paramount. Focus on creating well-structured, informative, and engaging lessons that cater to the needs of your students. Here are some tips:
- Plan Your Lessons: Outline your lessons in advance to ensure a logical flow and clear objectives.
- Break Down Complex Concepts: Simplify complex concepts into smaller, more manageable steps.
- Use Visual Aids: Incorporate visual aids like diagrams, tablature, and chord charts to enhance understanding.
- Provide Clear Explanations: Explain concepts clearly and concisely, using language that your students can understand.
- Demonstrate Techniques: Demonstrate techniques clearly and accurately, using proper form and technique.
- Provide Practice Exercises: Provide practice exercises that allow your students to apply what they have learned.
- Offer Feedback: Provide feedback on your students’ progress and offer suggestions for improvement.
Recording Great Guitar Lessons Starts Here
Building a diy guitar lesson recording setup is an investment in your career as a guitar instructor. By following the tips and techniques outlined in this guide, you can create high-quality lessons that sound professional and engage your students. Remember to prioritize sound quality, microphone technique, and effective editing and mixing. With a little practice and dedication, you’ll be producing top-notch guitar lessons in no time. Share your experiences with diy guitar lesson recording setups in the comments below, and let’s help each other create amazing learning experiences for guitar students everywhere!
