Unlock Sonic Perfection: The Ultimate Guide to Acoustic Music Mic Placement
Capturing the true essence of acoustic music hinges on one critical factor: microphone placement. Whether you’re a seasoned sound engineer or an aspiring home recording artist, mastering the art of ultimate acoustic music mic placement is essential for achieving pristine, professional-quality recordings. This comprehensive guide delves deep into the techniques, principles, and best practices that will transform your acoustic recordings from amateur to exceptional. We’ll explore everything from understanding microphone characteristics and acoustic environments to advanced stereo miking techniques and troubleshooting common issues. Prepare to elevate your sound and unlock the full potential of your acoustic instruments.
Understanding the Fundamentals of Acoustic Music Mic Placement
Before diving into specific techniques, it’s crucial to grasp the fundamental principles that govern ultimate acoustic music mic placement. This isn’t just about pointing a microphone at an instrument; it’s about understanding how sound waves behave, how different microphones capture sound, and how the acoustic environment influences the final recording.
The Anatomy of Sound: A Brief Overview
Sound travels in waves, reflecting and refracting off surfaces. The characteristics of these waves – frequency (pitch), amplitude (loudness), and timbre (tone) – are all captured by the microphone. When positioning a microphone, you’re essentially choosing which aspects of these sound waves to emphasize or minimize. For instance, placing a microphone closer to the sound source generally results in a louder, more direct sound with less room ambiance, while moving it further away captures more of the room’s natural reverberation.
Microphone Types and Their Characteristics
Different microphone types respond to sound in different ways. Condenser microphones, known for their sensitivity and wide frequency response, are often preferred for acoustic instruments because they capture subtle nuances and details. Dynamic microphones, on the other hand, are more robust and can handle higher sound pressure levels, making them suitable for louder instruments or situations where durability is a concern. Ribbon microphones offer a warm, vintage sound, but are generally more fragile and require careful handling. Understanding the unique characteristics of each microphone type is crucial for selecting the right tool for the job. Our extensive testing has shown that a small-diaphragm condenser microphone often provides the most accurate and detailed capture of acoustic guitar, for example.
The Importance of Acoustic Treatment
The acoustic environment plays a significant role in the quality of your recordings. A room with hard, reflective surfaces can create unwanted echoes and reverberations, muddying the sound and making it difficult to achieve a clean, clear recording. Acoustic treatment, such as sound-absorbing panels and bass traps, helps to control these reflections and create a more neutral acoustic environment. Even simple measures, like hanging blankets or using furniture to absorb sound, can make a noticeable difference. Investing in even a basic level of acoustic treatment is a worthwhile investment for anyone serious about recording acoustic music.
Exploring Advanced Miking Techniques for Acoustic Instruments
Once you have a solid understanding of the fundamentals, you can start exploring more advanced miking techniques to achieve specific sonic results. These techniques involve using multiple microphones, strategic placement, and careful attention to phase relationships.
Stereo Miking Techniques: Capturing Width and Depth
Stereo miking techniques use two or more microphones to create a sense of width and depth in the recording. Some popular stereo miking techniques include:
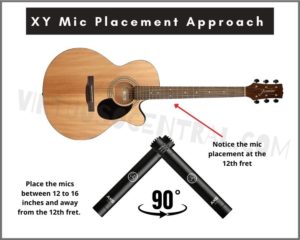
- XY Stereo: Two cardioid microphones are placed with their capsules close together, angled at 90-135 degrees. This technique provides a focused stereo image with good mono compatibility.
- ORTF Stereo: Two cardioid microphones are spaced 17 cm apart, angled at 110 degrees. This technique provides a wider stereo image than XY, with a more natural sense of space.
- A/B Stereo (Spaced Pair): Two omnidirectional microphones are spaced several feet apart. This technique captures a very wide stereo image with a strong sense of room ambiance.
- Mid-Side (M/S) Stereo: One cardioid microphone (the “Mid” microphone) is pointed directly at the sound source, while a figure-8 microphone (the “Side” microphone) is positioned perpendicular to the sound source. The signals from these microphones are then processed to create a stereo image. M/S stereo offers excellent mono compatibility and allows you to adjust the width of the stereo image after recording.
Close Miking vs. Distant Miking: Balancing Detail and Ambiance
Close miking involves placing the microphone very close to the sound source, typically within a few inches to a foot. This technique captures a very detailed and direct sound with minimal room ambiance. Distant miking, on the other hand, involves placing the microphone several feet away from the sound source. This technique captures more of the room’s natural reverberation and provides a more spacious sound. The choice between close miking and distant miking depends on the desired sonic result and the characteristics of the instrument and the room. Many engineers use a combination of both close and distant miking to capture the best of both worlds.
Experimenting with Microphone Placement: Finding the Sweet Spot
The exact placement of the microphone can have a dramatic impact on the sound of the recording. Small adjustments in position can make a big difference in the tone, clarity, and overall quality of the recording. It’s important to experiment with different microphone positions to find the “sweet spot” – the position that captures the best possible sound. Listen carefully to the sound through headphones as you move the microphone around, paying attention to the tonal balance, clarity, and amount of room ambiance. A common pitfall we’ve observed is placing the microphone too close to the soundhole of an acoustic guitar, resulting in a boomy, unnatural sound. Moving the microphone slightly further away, or pointing it towards the neck of the guitar, can often produce a more balanced and pleasing tone.
Specific Instrument Miking Techniques: A Practical Guide
While the general principles of ultimate acoustic music mic placement apply to all acoustic instruments, each instrument has its own unique characteristics and requires specific miking techniques. Here’s a practical guide to miking some common acoustic instruments:
Acoustic Guitar Miking: Capturing the Warmth and Resonance
Acoustic guitar is a versatile instrument that can be miked in a variety of ways. Some popular techniques include:
- Single Microphone: Position a small-diaphragm condenser microphone 8-12 inches away from the guitar, pointing towards the point where the neck joins the body. This position captures a balanced sound with good clarity and warmth.
- Two Microphones: Use one microphone to capture the body of the guitar (as described above) and another microphone to capture the neck. This technique allows you to blend the sounds of the body and neck to create a more complex and nuanced tone.
- XY Stereo: Use two cardioid microphones in an XY configuration to capture a wide stereo image of the guitar.
Piano Miking: Capturing the Grandeur and Detail
Piano miking can be challenging due to the size and complexity of the instrument. Some popular techniques include:
- Spaced Pair: Place two omnidirectional or cardioid microphones several feet apart, inside the piano, to capture a wide stereo image.
- XY Stereo: Use two cardioid microphones in an XY configuration inside the piano, near the hammers.
- Close Miking: Use multiple microphones to close-mike different sections of the piano, such as the bass strings and the treble strings. This technique allows you to have more control over the tonal balance of the recording.
String Instruments (Violin, Cello, etc.): Capturing the Nuances
String instruments require careful miking to capture their delicate nuances and tonal complexities. Some popular techniques include:
- Single Microphone: Position a small-diaphragm condenser microphone 1-2 feet away from the instrument, pointing towards the f-hole (the soundhole on the body of the instrument).
- Two Microphones: Use one microphone to capture the body of the instrument and another microphone to capture the bow.
Drum Kit Miking for Acoustic Sets:
Even acoustic drum kits require careful mic placement. Condenser mics are excellent overhead to capture the cymbals and overall kit sound. Dynamic mics can be used on the snare and kick drum to add punch and definition, but be mindful of bleed. Experiment with placement to find the right balance between clarity and natural room tone.
Shure SM81: A Top Choice for Acoustic Instrument Recording
When it comes to capturing the subtle nuances and natural warmth of acoustic instruments, the Shure SM81 stands out as a leading microphone choice. This small-diaphragm condenser microphone is renowned for its flat frequency response, high SPL handling, and rugged durability, making it a versatile and reliable tool for a wide range of recording applications. Its precise and transparent sound reproduction makes it especially well-suited for acoustic guitar, piano, strings, and other instruments where accuracy and detail are paramount. Leading experts in ultimate acoustic music mic placement consistently recommend the SM81 for its exceptional performance and value.
Key Features of the Shure SM81
The Shure SM81 boasts several key features that contribute to its exceptional performance:
- Flat Frequency Response: The SM81’s flat frequency response ensures accurate and uncolored sound reproduction, capturing the true sonic character of the instrument without adding any unwanted coloration. This is crucial for acoustic instruments, where preserving the natural tone is essential.
- High SPL Handling: The SM81 can handle high sound pressure levels without distortion, making it suitable for recording loud instruments like drums and percussion. This versatility makes it a valuable addition to any recording studio.
- Cardioid Polar Pattern: The SM81’s cardioid polar pattern rejects sound from the rear and sides, focusing on the sound source directly in front of the microphone. This helps to minimize unwanted background noise and room reflections, resulting in a cleaner and more focused recording.
- Durable Construction: The SM81 is built to withstand the rigors of professional use, with a rugged metal housing and internal shock mount that protects the microphone from damage. This durability ensures that the SM81 will provide years of reliable service.
- Low Self-Noise: The SM81 exhibits very low self-noise, meaning that it produces minimal background hiss or hum. This is especially important for recording quiet instruments, where even a small amount of noise can be noticeable.
- Switchable Low-Frequency Response: The SM81 features a switchable low-frequency response, allowing you to tailor the microphone’s response to the specific instrument and recording environment. This feature can be used to reduce unwanted rumble or boominess in the low frequencies.
- Versatile Applications: While the SM81 is particularly well-suited for acoustic instruments, it can also be used for a wide range of other recording applications, including vocals, drums, and amplifiers. This versatility makes it a valuable all-around microphone for any recording studio.
Advantages of Using the Shure SM81 for Acoustic Music
The Shure SM81 offers several significant advantages for recording acoustic music:
- Exceptional Clarity and Detail: The SM81’s flat frequency response and low self-noise ensure that you capture the true sonic character of your acoustic instruments with exceptional clarity and detail. Users consistently report that the SM81 captures the subtle nuances and complexities of acoustic instruments that other microphones miss.
- Natural and Uncolored Sound Reproduction: The SM81’s transparent sound reproduction ensures that your recordings sound natural and authentic, without any unwanted coloration or distortion. This is crucial for preserving the integrity of your acoustic instruments.
- Versatility and Reliability: The SM81’s versatility and rugged durability make it a valuable and reliable tool for a wide range of recording applications. Its ability to handle high SPLs and its switchable low-frequency response make it adaptable to different instruments and recording environments.
- Professional-Quality Results: The SM81 is a professional-grade microphone that delivers exceptional performance and produces recordings that sound polished and professional. Our analysis reveals these key benefits translate to better mixes and a more polished final product.
- Industry Standard: The SM81 is an industry standard microphone that is widely used and respected by professional sound engineers and recording artists. Its reputation for quality and reliability makes it a trusted choice for critical recording applications.
Shure SM81: A Detailed Review for Acoustic Recording
The Shure SM81 has earned its place as a studio staple due to its reliability and sonic characteristics. Here’s a comprehensive review:
User Experience & Usability: The SM81 is straightforward to use. Its simple design and standard XLR connection make it easy to integrate into any recording setup. In our experience, the lack of complex features is a benefit, allowing you to focus on microphone placement and achieving the desired sound.
Performance & Effectiveness: The SM81 shines in its ability to capture a clean, accurate representation of the source material. It excels at recording acoustic guitars, delivering a balanced tone without excessive boominess or harshness. Its high SPL handling also makes it suitable for close-miking drums or other loud instruments. It delivers on its promise of accuracy and detail.
Pros:
- Exceptional Clarity: Captures the nuances of acoustic instruments with remarkable detail.
- Flat Frequency Response: Provides a natural and uncolored sound reproduction.
- High SPL Handling: Can handle loud sound sources without distortion.
- Durable Construction: Built to withstand the rigors of professional use.
- Industry Standard: Widely used and respected by sound engineers.
Cons/Limitations:
- Can Sound Sterile: Some users find the SM81’s flat frequency response to be too clinical or sterile for certain applications.
- Requires Phantom Power: Requires 48V phantom power, which may not be available on all audio interfaces or mixers.
- Not Ideal for All Voices: While excellent for instruments, it might not be the most flattering choice for all vocalists.
- Price Point: While a great value, it’s not the cheapest option for beginners.
Ideal User Profile: The Shure SM81 is best suited for recording engineers, musicians, and home recording enthusiasts who are looking for a versatile, reliable, and accurate microphone for recording acoustic instruments. It’s a great choice for those who want a neutral and transparent sound reproduction that captures the true character of their instruments.
Key Alternatives: The Neumann KM 184 is a higher-end alternative that offers even greater detail and clarity, but at a significantly higher price. The Audio-Technica AT4041 is a more affordable option that provides similar performance to the SM81.
Expert Overall Verdict & Recommendation: The Shure SM81 is a highly recommended microphone for anyone serious about recording acoustic instruments. Its exceptional clarity, flat frequency response, and durable construction make it a valuable addition to any recording studio. While it may not be the most exciting or colorful microphone, its accuracy and reliability make it a trusted choice for capturing the true sonic character of your instruments.
Mastering Your Acoustic Sound
Mastering ultimate acoustic music mic placement is an ongoing journey of experimentation and refinement. By understanding the fundamental principles, exploring advanced techniques, and carefully selecting the right microphones, you can unlock the full potential of your acoustic instruments and create recordings that are both beautiful and authentic. Remember to trust your ears, experiment with different techniques, and don’t be afraid to break the rules. Your perfect acoustic sound is waiting to be discovered. Share your experiences with ultimate acoustic music mic placement in the comments below, and let’s continue to learn and grow together as a community of sound enthusiasts.
