Mastering Guitar Setup: Achieving Perfect Playability Without a Capo
A flawlessly set-up guitar is a joy to play. It responds effortlessly to your touch, allowing you to express yourself musically without fighting the instrument. While many guitarists rely on a capo during setups, achieving an in-depth guitar setup without a capo offers a superior and more accurate result. This comprehensive guide dives deep into the process, providing the knowledge and techniques to optimize your guitar’s playability and intonation for open-string playing.
This isn’t just a superficial guide; it’s a roadmap to understanding the intricate relationship between various guitar components and how they interact to influence the overall playing experience. We’ll explore each step in detail, from neck relief adjustment to bridge saddle height optimization, ensuring you have the tools to transform your guitar into a finely tuned instrument. Prepare to unlock your guitar’s full potential and experience the satisfaction of playing a truly well-set-up instrument.
Understanding the Importance of a Capo-Free Guitar Setup
Why dedicate an entire guide to setting up a guitar without a capo? The answer lies in accuracy and achieving optimal playability in the instrument’s natural state. A capo artificially raises the string tension and changes the break angle over the nut, masking underlying issues that might otherwise be apparent. By performing an in-depth guitar setup without a capo, you’re addressing the root causes of playability problems, not just temporarily compensating for them. This approach leads to a more stable, consistent, and ultimately more enjoyable playing experience.
Moreover, playing without a capo is essential for many musical styles and techniques. Fingerstyle players, open-tuning enthusiasts, and those who frequently utilize the full range of the fretboard rely on accurate intonation and comfortable action across the entire neck. A setup optimized for capo use can compromise these aspects, hindering your ability to explore the instrument’s full expressive potential. As luthiers often emphasize, a proper setup starts with the guitar in its natural state.
Addressing Common Misconceptions
One common misconception is that a capo can be used to simulate the feel of a properly set-up guitar. While a capo can temporarily improve playability in certain positions, it doesn’t address fundamental issues like incorrect neck relief, uneven fret heights, or improperly cut nut slots. These problems will still manifest when playing without a capo, leading to buzzing, intonation issues, and overall discomfort. Therefore, a capo should be viewed as a tool for transposing keys, not a substitute for a thorough setup.
Essential Tools for an In-Depth Guitar Setup
Before embarking on your guitar setup journey, gather the necessary tools. Having the right equipment will not only make the process easier but also minimize the risk of damaging your instrument. Here’s a list of essential tools:
- String Winder: For quickly removing and installing strings.
- String Cutters: For trimming excess string length.
- Tuner: A reliable tuner is essential for accurate intonation adjustment. A strobe tuner is ideal, but a quality chromatic tuner will suffice.
- Capo (Optional): While the focus is on a capo-free setup, a capo can be useful for certain tasks, such as checking fret buzz.
- Straight Edge: A notched straight edge specifically designed for guitars is crucial for accurately assessing neck relief.
- Feeler Gauges: Used in conjunction with the straight edge to measure the precise amount of neck relief.
- Screwdrivers: A set of screwdrivers with various head sizes is needed for adjusting truss rods, bridge saddles, and other components.
- Allen Wrenches: Many guitars, particularly electric guitars, use Allen wrenches for truss rod and saddle height adjustments.
- Fret Rocker: Used to identify high frets that may be causing buzzing.
- Fret Files: For leveling and shaping frets (requires experience and caution).
- Radius Gauges: For matching the bridge saddle radius to the fretboard radius.
- Nut Files: Specialized files for shaping and deepening nut slots.
- Cleaning Supplies: Guitar polish, fretboard cleaner, and microfiber cloths for cleaning and maintaining your instrument.
Step-by-Step Guide to Guitar Setup Without a Capo
Now, let’s delve into the step-by-step process of performing an in-depth guitar setup without a capo. Remember to work methodically and patiently, making small adjustments and carefully observing the results.
1. String Removal and Neck Inspection
Begin by removing the old strings. This allows for a thorough inspection of the neck and fretboard. Look for any signs of damage, such as cracks, loose frets, or excessive wear. Clean the fretboard with a specialized fretboard cleaner and a microfiber cloth to remove dirt and grime.
2. Neck Relief Adjustment
Neck relief refers to the slight bow in the guitar neck. A small amount of relief is necessary to prevent buzzing, particularly in the middle of the neck. To check neck relief, fret the low E string at the first fret and at the fret where the neck joins the body (usually the 14th or 15th fret). Use a feeler gauge to measure the distance between the bottom of the string and the top of the 7th or 8th fret. The ideal relief is typically between 0.005″ and 0.010″.
Adjust the truss rod to increase or decrease neck relief. The truss rod is usually located at the headstock or inside the soundhole. Use the appropriate Allen wrench or screwdriver to make small adjustments, typically no more than a quarter turn at a time. Allow the neck to settle for a few hours after each adjustment before rechecking the relief.
3. Nut Height Adjustment
The nut height plays a crucial role in the guitar’s action and playability, especially in the first few frets. If the nut slots are too high, the strings will be difficult to fret, leading to discomfort and fatigue. If the slots are too low, the strings will buzz against the first few frets.
To check the nut height, fret each string at the third fret. The string should just barely clear the top of the first fret. If there’s a significant gap, the nut slots are too high. If the string rests directly on the first fret, the slots are too low.
Adjusting the nut height requires specialized nut files. File the slots gradually, checking the height frequently. If you accidentally file a slot too low, you can shim the nut with a thin piece of paper or plastic.
4. Bridge Saddle Height Adjustment
The bridge saddle height determines the overall action of the guitar. Lowering the saddles will decrease the action, making the strings easier to fret. Raising the saddles will increase the action, potentially reducing buzzing but also making the guitar more difficult to play.
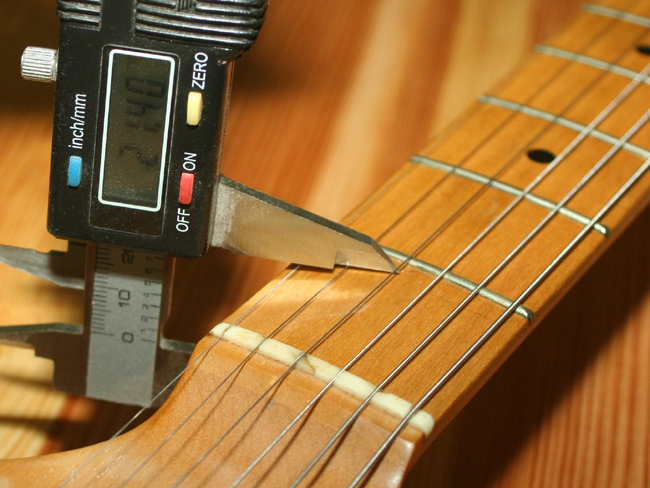
Adjust the saddle height until you achieve a comfortable action without excessive buzzing. The ideal action will vary depending on your playing style and preferences. A good starting point is to measure the string height at the 12th fret. For electric guitars, a typical action is around 1.5mm to 2mm for the high E string and 2mm to 2.5mm for the low E string. For acoustic guitars, the action is often slightly higher.
5. Intonation Adjustment
Intonation refers to the accuracy of the notes as you move up the fretboard. A guitar with poor intonation will sound out of tune, even when the open strings are perfectly tuned. Intonation is adjusted by moving the bridge saddles forward or backward.
To check intonation, tune the open E string to pitch. Then, fret the E string at the 12th fret. Compare the pitch of the fretted note to the pitch of the 12th fret harmonic. If the fretted note is sharp, the saddle needs to be moved back. If the fretted note is flat, the saddle needs to be moved forward.
Repeat this process for each string, adjusting the saddles as needed until the intonation is accurate across the entire fretboard.
Fretboard Radius and its Impact on Setup
The fretboard radius, or the curvature of the fretboard, plays a significant role in guitar setup. Matching the bridge saddle radius to the fretboard radius ensures that the strings follow the same curvature, resulting in consistent action and comfortable playability. Radius gauges are used to measure the fretboard radius and adjust the saddle heights accordingly. This is a subtle but important detail that contributes to a truly optimized setup.
The Role of a Professional Luthier
While this guide provides a comprehensive overview of in-depth guitar setup without a capo, it’s important to recognize the value of a professional luthier. A skilled luthier possesses the expertise, experience, and specialized tools to address complex issues such as fret leveling, neck resets, and structural repairs. If you’re uncomfortable performing any of these procedures yourself, or if you encounter problems you can’t resolve, seeking the assistance of a qualified luthier is always a wise decision. A luthier can also provide valuable insights and personalized recommendations to optimize your guitar’s playability and tone.
Benefits of a Perfectly Set Up Guitar
A meticulously performed in-depth guitar setup without a capo provides numerous benefits, significantly enhancing your playing experience. Here are a few key advantages:
- Improved Playability: Lower action, comfortable string spacing, and accurate intonation make the guitar easier and more enjoyable to play.
- Enhanced Tone: A well-set-up guitar resonates more freely, resulting in a richer, fuller tone.
- Reduced Buzzing: Eliminating fret buzz allows you to play cleanly and clearly without unwanted noise.
- Increased Accuracy: Accurate intonation ensures that the notes you play are in tune, allowing you to express yourself musically with greater precision.
- Greater Inspiration: A guitar that feels and sounds great inspires you to play more often and explore new musical ideas.
Choosing the Right Strings for Your Setup
String choice is a crucial aspect of guitar setup, influencing both playability and tone. Different string gauges and materials offer distinct characteristics. Lighter gauge strings are easier to bend and fret, making them suitable for beginners and players who prefer a lighter touch. Heavier gauge strings provide more sustain and a fuller tone, but they require more finger strength. String materials, such as nickel, stainless steel, and coated strings, also affect the tone and feel. Experiment with different string types to find the ones that best suit your playing style and preferences. Remember to consider string tension when making adjustments during your in-depth guitar setup without a capo.
Maintaining Your Guitar After Setup
Once you’ve completed your in-depth guitar setup without a capo, it’s essential to maintain your instrument to preserve its playability and tone. Regularly clean the fretboard and body with appropriate cleaning products. Replace the strings periodically, as they lose their vibrancy and intonation over time. Store your guitar in a case when not in use to protect it from humidity and temperature changes. By following these simple maintenance tips, you can ensure that your guitar remains in optimal condition for years to come.
Achieving Peak Performance: The Payoff for Careful Setup
Embarking on an in-depth guitar setup without a capo might seem daunting at first, but the rewards are well worth the effort. By understanding the principles of guitar setup and carefully following the steps outlined in this guide, you can transform your instrument into a finely tuned machine that responds effortlessly to your touch. The resulting improvement in playability, tone, and overall enjoyment will inspire you to play more often and explore new musical horizons. So, take the time to invest in your guitar, and you’ll be amazed at the difference it makes.
