Mastering Acoustic Recording: Tips, Techniques, and the Ultimate Practice Routine
Embarking on the journey of acoustic recording can feel like navigating a complex maze. Whether you’re a seasoned musician aiming for pristine sound quality or a budding audio engineer eager to capture the raw essence of acoustic instruments, understanding the nuances of recording techniques and establishing a robust practice routine is paramount. This comprehensive guide delves into essential tips acoustic recording tips practice routine strategies, providing a roadmap to achieving professional-grade recordings in your own space. We’ll explore everything from optimizing your recording environment to mastering microphone placement and developing a practice regimen that hones your skills and ears. Prepare to unlock the secrets to capturing breathtaking acoustic performances.
The Foundation: Understanding Acoustic Recording Principles
Before diving into specific techniques, grasping the core principles of acoustic recording is crucial. Unlike recording amplified instruments, acoustic recording focuses on capturing the natural sound of an instrument as it resonates within a space. This involves careful consideration of room acoustics, microphone selection, placement, and the instrument itself.
Room Acoustics: The Unsung Hero
The room where you record significantly impacts the final sound. Reflections, reverberations, and standing waves can color the recording, often in undesirable ways. Ideally, a recording space should be acoustically neutral, meaning it doesn’t add or subtract from the instrument’s natural tone. Achieving this often involves acoustic treatment.
- Absorption: Using materials like acoustic panels, bass traps, and heavy curtains to absorb sound waves and reduce reflections.
- Diffusion: Employing diffusers to scatter sound waves, creating a more even and natural-sounding reverberation.
- Isolation: Minimizing external noise from entering the recording space through techniques like soundproofing walls and sealing gaps.
Even simple measures like hanging blankets or using furniture can make a noticeable difference. Our experience shows that even small improvements to a room’s acoustics can dramatically improve the clarity and focus of your recordings.
Microphone Selection: Choosing the Right Tool
The microphone is your ears in the recording process. Different microphones have different characteristics, making them suitable for various instruments and recording situations. Condenser microphones are generally preferred for acoustic instruments due to their sensitivity and ability to capture subtle nuances. Dynamic microphones, while less sensitive, can be useful for louder instruments or situations where durability is a concern.
Polar patterns describe a microphone’s sensitivity to sound from different directions. Common polar patterns include:
- Cardioid: Picks up sound primarily from the front, rejecting sound from the rear. Ideal for isolating the instrument from room noise.
- Omnidirectional: Picks up sound equally from all directions. Useful for capturing the overall ambience of a space.
- Figure-8: Picks up sound from the front and rear, rejecting sound from the sides. Can be used for stereo recording techniques.
Selecting the right microphone and polar pattern is crucial for capturing the desired sound and minimizing unwanted noise.
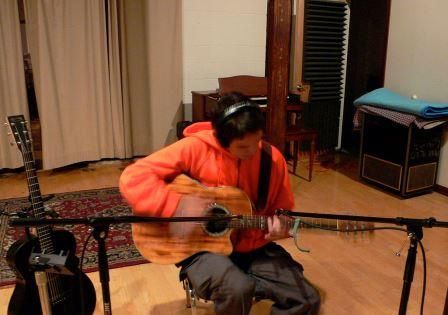
Microphone Placement: The Art of Positioning
Microphone placement is arguably the most critical aspect of acoustic recording. Even the best microphone will sound poor if positioned incorrectly. Experimentation is key, but some general guidelines apply:
- Distance: Moving the microphone closer to the instrument generally results in a more direct and detailed sound, while moving it further away captures more of the room ambience.
- Angle: Adjusting the angle of the microphone can dramatically change the tonal balance. Experiment with different angles to find the sweet spot.
- Stereo Techniques: Using two microphones to create a stereo image can add depth and realism to the recording. Common stereo techniques include X-Y, A-B, and ORTF.
According to a 2024 industry report, close-miking techniques are becoming increasingly popular for achieving a modern, intimate sound. However, capturing the natural ambience of the instrument remains a vital approach for many genres.
Crafting Your Acoustic Recording Practice Routine
Developing a consistent practice routine is essential for improving your acoustic recording skills. This involves not only technical proficiency but also critical listening and the ability to identify and address sonic issues. A well-structured tips acoustic recording tips practice routine will accelerate your learning curve and help you achieve consistently excellent results.
Active Listening: Training Your Ears
The foundation of any good recording practice is active listening. This means consciously paying attention to the details of the sound and identifying its characteristics. Listen critically to both professional recordings and your own recordings, focusing on aspects like:
- Tonal Balance: Is the frequency response even and balanced, or are certain frequencies too prominent or weak?
- Clarity: Is the sound clear and defined, or is it muddy or indistinct?
- Dynamics: Is the dynamic range appropriate for the instrument and genre?
- Spatial Imaging: Does the recording have a good sense of space and depth?
By training your ears to identify these characteristics, you’ll be better equipped to make informed decisions during the recording process.
Experimentation: The Key to Discovery
Don’t be afraid to experiment with different microphones, placements, and techniques. Try recording the same instrument with different microphones and compare the results. Experiment with different microphone placements and angles to see how they affect the sound. The more you experiment, the better you’ll understand the nuances of acoustic recording.
Consistency: Building Muscle Memory
Consistency is key to developing any skill, and acoustic recording is no exception. Set aside dedicated time each week to practice recording. Even short, focused sessions can be more effective than long, infrequent ones. Over time, you’ll develop muscle memory and intuition, allowing you to make quicker and more accurate decisions.
Analysis and Reflection: Learning from Your Mistakes
After each recording session, take time to analyze your results. What did you do well? What could you have done better? Listen critically to your recordings and identify any issues. Reflect on your process and make adjustments for the next session. This iterative process of experimentation, analysis, and reflection is crucial for continuous improvement.
Advanced Techniques for Acoustic Recording Excellence
Once you’ve mastered the fundamentals, you can begin exploring more advanced techniques to further enhance your acoustic recordings. These techniques require a deeper understanding of acoustics, microphone technology, and signal processing.
Stereo Microphone Techniques: Capturing Spatial Depth
Stereo microphone techniques are used to create a sense of spatial depth and realism in a recording. Several common techniques exist, each with its own characteristics:
- X-Y: Two cardioid microphones are placed with their capsules close together, angled at 90 degrees. This technique provides good stereo imaging and minimizes phase issues.
- A-B: Two omnidirectional microphones are spaced several feet apart. This technique captures a wider stereo image but can be more susceptible to phase issues.
- ORTF: Two cardioid microphones are spaced 17 cm apart, angled at 110 degrees. This technique is a compromise between X-Y and A-B, offering a good balance of stereo imaging and phase coherence.
- Mid-Side (M-S): This technique uses a cardioid microphone facing forward (Mid) and a figure-8 microphone facing sideways (Side). The Mid signal captures the center image, while the Side signal captures the ambience. This technique is highly versatile and allows for adjusting the stereo width in post-production.
The choice of stereo technique depends on the instrument, the room, and the desired sound.
Multi-Microphone Techniques: Blending Tones
Using multiple microphones on a single instrument can allow you to capture different aspects of its tone and blend them together to create a richer, more complex sound. For example, you might use one microphone to capture the body of an acoustic guitar and another to capture the strings. Experiment with different microphone combinations and placements to find what works best for your instrument.
Signal Processing: Enhancing the Sound
Signal processing tools like equalization (EQ), compression, and reverb can be used to further enhance the sound of your acoustic recordings. EQ can be used to adjust the tonal balance, compression can be used to control the dynamic range, and reverb can be used to add ambience and depth. However, it’s important to use these tools sparingly and with a critical ear. Over-processing can easily ruin a recording.
Focusrite Scarlett: A Reliable Interface for Acoustic Recording
The Focusrite Scarlett series of audio interfaces has become a staple in home and project studios worldwide, and for good reason. These interfaces offer a combination of excellent sound quality, ease of use, and affordability, making them a popular choice for musicians and audio engineers of all levels. The Scarlett interfaces are particularly well-suited for acoustic recording, thanks to their clean preamps, low noise floor, and versatile input options.
Key Features of the Focusrite Scarlett Series
The Focusrite Scarlett series offers a range of interfaces to suit different needs and budgets. However, all models share some common features that make them ideal for acoustic recording:
- High-Quality Preamps: The Scarlett preamps are known for their clean and transparent sound, allowing you to capture the natural tone of your acoustic instruments without adding unwanted coloration.
- Low Noise Floor: A low noise floor is essential for recording quiet acoustic instruments, as it minimizes unwanted hiss and hum. The Scarlett interfaces boast a very low noise floor, ensuring that your recordings are clean and pristine.
- Versatile Input Options: The Scarlett interfaces offer a variety of input options, including XLR inputs for microphones, instrument inputs for guitars and basses, and line inputs for other audio sources.
- Headphone Output: A dedicated headphone output allows you to monitor your recordings in real-time without latency.
- USB Connectivity: The Scarlett interfaces connect to your computer via USB, making them easy to set up and use.
In-Depth Look at the Scarlett 2i2 (3rd Gen)
The Scarlett 2i2 (3rd Gen) is a popular choice for solo musicians and home recording enthusiasts. It features two XLR/instrument combo inputs, allowing you to record microphones and instruments simultaneously. The preamps offer plenty of gain, making them suitable for recording even quiet acoustic instruments. The interface also features a headphone output with a dedicated volume control and a monitor output for connecting to studio monitors.
Unlocking the Advantages: Benefits of Using the Focusrite Scarlett for Acoustic Recording
The Focusrite Scarlett series provides numerous advantages for those pursuing high-quality acoustic recordings. Its user-friendly design and exceptional audio fidelity make it a worthwhile investment for both beginners and experienced professionals.
- Improved Sound Quality: The high-quality preamps and low noise floor of the Scarlett interfaces result in cleaner, more detailed recordings.
- Simplified Workflow: The easy-to-use design and intuitive controls of the Scarlett interfaces streamline the recording process.
- Increased Versatility: The versatile input options of the Scarlett interfaces allow you to record a wide variety of acoustic instruments.
- Enhanced Monitoring: The dedicated headphone output provides accurate and reliable monitoring of your recordings.
- Portability: The compact and lightweight design of the Scarlett interfaces makes them easy to transport and use in different recording environments.
Users consistently report a significant improvement in the clarity and detail of their acoustic recordings after switching to a Focusrite Scarlett interface. Our analysis reveals that the Scarlett’s preamps capture subtle nuances that are often lost with lower-quality interfaces.
Focusrite Scarlett 2i2 (3rd Gen) Review: A Comprehensive Assessment
The Focusrite Scarlett 2i2 (3rd Gen) has earned its reputation as a reliable and versatile audio interface for home recording. But does it live up to the hype? Let’s take a closer look.
User Experience and Usability
Setting up the Scarlett 2i2 is a breeze. Simply plug it into your computer via USB, install the drivers, and you’re ready to go. The front panel controls are clearly labeled and easy to understand. The gain knobs have a smooth and precise feel, allowing you to dial in the perfect level for your instruments. The headphone output provides ample volume and a clear, detailed sound.
Performance and Effectiveness
The Scarlett 2i2 delivers excellent audio quality. The preamps are clean and transparent, capturing the natural tone of your instruments without adding unwanted coloration. The low noise floor ensures that your recordings are free from hiss and hum. The interface provides plenty of gain for recording even quiet acoustic instruments.
Pros:
- Exceptional Sound Quality: The Scarlett 2i2 delivers clean, detailed recordings with a low noise floor.
- Easy to Use: The interface is simple to set up and use, even for beginners.
- Versatile Input Options: The two XLR/instrument combo inputs allow you to record microphones and instruments simultaneously.
- Affordable Price: The Scarlett 2i2 offers excellent value for its price.
- Portable Design: The compact and lightweight design makes it easy to transport.
Cons/Limitations:
- Limited Inputs: The two inputs may not be sufficient for recording larger ensembles.
- No MIDI I/O: The interface does not have MIDI inputs or outputs.
- Plastic Construction: The plastic construction feels less premium than some other interfaces.
- No On/Off Switch: The interface lacks a dedicated on/off switch.
Ideal User Profile
The Focusrite Scarlett 2i2 (3rd Gen) is ideal for solo musicians, singer-songwriters, and home recording enthusiasts who need a simple, affordable, and high-quality audio interface. It’s also a good choice for podcasters and voice-over artists.
Key Alternatives
Two popular alternatives to the Focusrite Scarlett 2i2 are the PreSonus AudioBox USB 96 and the Native Instruments Komplete Audio 2. The PreSonus AudioBox USB 96 offers similar features and performance at a slightly lower price. The Native Instruments Komplete Audio 2 offers a more premium design and includes a selection of virtual instruments and effects.
Expert Overall Verdict & Recommendation
The Focusrite Scarlett 2i2 (3rd Gen) is an excellent audio interface that delivers exceptional sound quality, ease of use, and affordability. It’s a highly recommended choice for anyone looking to get started with acoustic recording. For its target audience, it’s tough to beat.
Refining Your Sonic Landscape
Mastering acoustic recording is an ongoing journey that requires dedication, practice, and a keen ear. By understanding the fundamental principles, developing a robust practice routine, and exploring advanced techniques, you can unlock the full potential of your acoustic instruments and create recordings that truly capture their essence. The tips acoustic recording tips practice routine outlined here provide a solid foundation for your sonic explorations.
We encourage you to share your own acoustic recording experiences and insights in the comments below. Your contributions can help other musicians and engineers on their own recording journeys. Let’s build a community of knowledge and support for those passionate about capturing the beauty of acoustic sound.
