Achieving Acoustic Perfection: A Step-by-Step Guide to EQ Settings
Crafting the perfect acoustic sound is an art, and like any art form, it requires a blend of skill, knowledge, and the right tools. Equalization (EQ) is arguably one of the most crucial tools in an audio engineer’s arsenal, allowing you to sculpt the tonal balance of your acoustic instruments and vocals. Whether you’re a seasoned professional or just starting your journey, understanding step by step acoustic music eq settings is paramount to achieving a polished, professional sound. This comprehensive guide will take you through the fundamentals of EQ, provide practical step-by-step instructions, and offer expert tips to help you master the art of acoustic equalization.
We’ll delve into the core concepts of EQ, explore common frequency ranges and their impact on acoustic instruments, and provide practical examples of how to address specific sonic issues. This isn’t just a theoretical overview; it’s a hands-on guide designed to empower you with the knowledge and skills to confidently shape your acoustic soundscapes. By the end of this article, you’ll be equipped with a solid understanding of EQ principles and a step-by-step approach to achieving acoustic perfection.
Understanding the Fundamentals of Acoustic EQ
Before diving into specific settings, it’s crucial to understand the core concepts of equalization. EQ, at its heart, is the process of adjusting the amplitude of different frequencies within an audio signal. This allows you to boost or cut specific frequencies, shaping the overall tonal balance and addressing unwanted sonic characteristics. Think of it like a sculptor carefully chiseling away at a block of marble to reveal the desired form.
A typical EQ plugin or hardware unit features several key parameters:
- Frequency: This determines the center frequency that the EQ band will affect.
- Gain: This controls the amount of boost or cut applied to the selected frequency.
- Q (bandwidth): This determines the width of the frequency band affected by the EQ. A narrow Q affects a small range of frequencies, while a wide Q affects a broader range.
- Filter Type: This specifies the shape of the EQ curve, such as a bell curve, shelving filter, or high-pass/low-pass filter.
Understanding these parameters is essential for making informed decisions about your EQ settings. Experiment with each parameter to hear how it affects the sound and develop a feel for how they interact.
Common Frequency Ranges and Their Impact
Different frequency ranges contribute to different aspects of the sound. Knowing which frequencies to target is crucial for effective EQing. Here’s a general overview:
- 20Hz – 60Hz: Sub-bass frequencies. These frequencies can add weight and rumble to the sound, but too much can make it muddy.
- 60Hz – 250Hz: Bass frequencies. This range provides the fundamental tone of most instruments. Adjusting these frequencies can add warmth, fullness, or punch.
- 250Hz – 500Hz: Low-mid frequencies. This range can add body and thickness to the sound, but too much can make it sound boxy or muffled.
- 500Hz – 2kHz: Mid frequencies. This range is crucial for clarity and definition. Adjusting these frequencies can improve the intelligibility of vocals and the presence of instruments.
- 2kHz – 4kHz: Upper-mid frequencies. This range can add brightness and clarity, but too much can make the sound harsh or fatiguing.
- 4kHz – 16kHz: High frequencies. This range adds air and sparkle to the sound. Too much can make the sound sibilant or brittle.
These are general guidelines, and the specific frequencies you target will depend on the instrument, the recording, and your desired sound.
A Step-by-Step Guide to EQing Acoustic Instruments
Now, let’s dive into a practical, step by step acoustic music eq settings guide for common acoustic instruments. Remember, these are starting points, and you should always adjust the settings based on your own ears and the specific needs of the recording.
Step 1: Identify Problem Areas
The first step is to listen carefully to the recording and identify any problem areas. Common issues include muddiness, boxiness, harshness, and sibilance. Use headphones or studio monitors to get an accurate representation of the sound.
Step 2: Apply Subtractive EQ
Subtractive EQ involves cutting frequencies to remove unwanted resonances or problem areas. This is generally a better approach than boosting frequencies, as it can create a cleaner, more natural sound. Use a narrow Q to target specific problem frequencies.
Step 3: Address Muddiness (Typically 200Hz – 500Hz)
Muddiness often occurs in the low-mid frequencies. Use a broad, gentle cut around 250Hz – 500Hz to clear up the low end. For acoustic guitars, try cutting around 300Hz to remove boxiness.
Step 4: Tame Harshness (Typically 2kHz – 4kHz)
Harshness can be fatiguing to listen to. Use a narrow cut around 2kHz – 4kHz to tame harsh frequencies. Be careful not to cut too much, as this can make the sound dull.
Step 5: Control Sibilance (Typically 5kHz – 8kHz)
Sibilance refers to harsh “s” sounds in vocals. Use a de-esser or a narrow cut around 5kHz – 8kHz to control sibilance. Experiment with different frequencies and Q values to find the sweet spot.
Step 6: Add Clarity and Air (Use Sparingly)
Once you’ve addressed the problem areas, you can add clarity and air by boosting the high frequencies. Use a high-shelf filter to boost frequencies above 8kHz. Be careful not to boost too much, as this can make the sound brittle or harsh.
Step 7: Fine-Tune and Listen in Context
The final step is to fine-tune your EQ settings and listen to the instrument in the context of the mix. Make small adjustments as needed to ensure that the instrument sits well with the other elements of the song. A/B test your changes frequently to make sure you are improving the sound.
Specific EQ Settings for Acoustic Instruments
Let’s explore some specific EQ settings for common acoustic instruments, building upon the step by step acoustic music eq settings foundation we’ve established.
Acoustic Guitar EQ Settings
- Cut around 300Hz: Remove boxiness and muddiness.
- Boost around 2kHz – 4kHz: Add clarity and definition.
- High-shelf boost above 8kHz: Add air and sparkle (use sparingly).
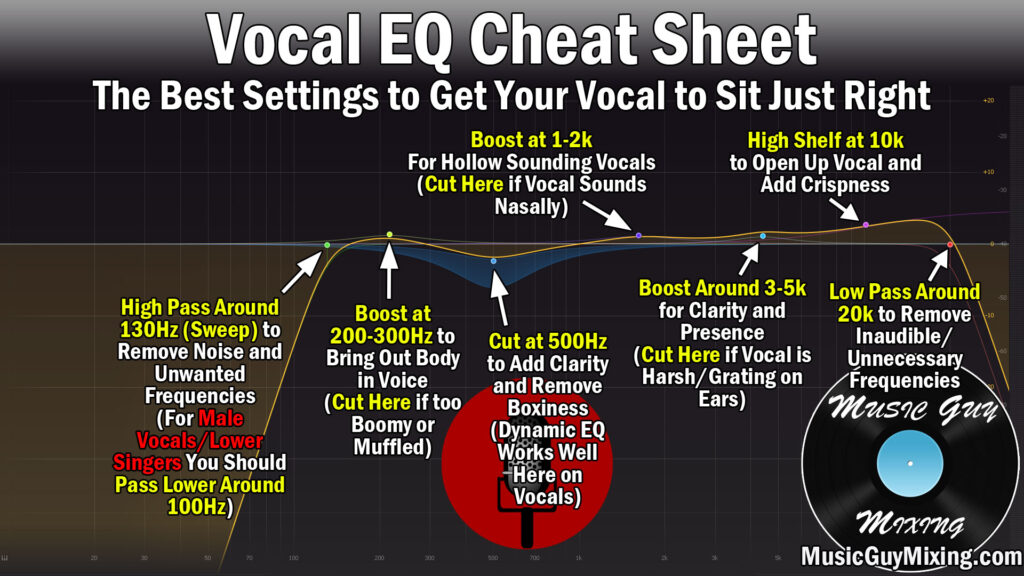
Acoustic Vocal EQ Settings
- High-pass filter below 80Hz: Remove rumble and low-frequency noise.
- Cut around 250Hz: Reduce muddiness.
- Boost around 1kHz – 3kHz: Add presence and intelligibility.
- De-ess around 5kHz – 8kHz: Control sibilance.
Acoustic Piano EQ Settings
- Cut around 200Hz: Remove muddiness.
- Boost around 3kHz – 5kHz: Add clarity and brilliance.
- High-shelf boost above 10kHz: Add air and sparkle (use sparingly).
Remember, these are starting points, and you should always adjust the settings based on your own ears and the specific needs of the recording.
FabFilter Pro-Q 3: A Powerful EQ Tool for Acoustic Music
When it comes to EQ plugins, FabFilter Pro-Q 3 stands out as a top-tier choice for professionals and enthusiasts alike. Its intuitive interface, powerful features, and pristine sound quality make it an ideal tool for shaping the tonal balance of acoustic instruments and vocals. Pro-Q 3’s versatility allows for both surgical precision and broad, musical adjustments, making it suitable for a wide range of EQ tasks.
Key Features of FabFilter Pro-Q 3
- Spectrum Analyzer: Pro-Q 3 features a real-time spectrum analyzer that provides visual feedback on the frequency content of the audio signal. This allows you to identify problem areas and make informed decisions about your EQ settings.
- Dynamic EQ: Pro-Q 3’s dynamic EQ feature allows you to create EQ bands that respond to the dynamics of the audio signal. This is useful for addressing issues that only occur at certain volume levels.
- Mid/Side Processing: Pro-Q 3 supports mid/side processing, which allows you to EQ the center and side channels of the audio signal independently. This can be useful for widening the stereo image or addressing specific issues in the center or side channels.
- EQ Match: Pro-Q 3’s EQ Match feature allows you to match the EQ curve of one audio signal to another. This can be useful for creating a consistent tonal balance across multiple tracks.
- Linear Phase Mode: Pro-Q 3 offers a linear phase mode, which preserves the phase relationships between different frequencies. This can be important for maintaining the clarity and transient response of the audio signal.
- Various Filter Shapes: Pro-Q 3 offers a wide range of filter shapes, including bell curves, shelving filters, high-pass/low-pass filters, and notch filters. This allows you to precisely shape the EQ curve to achieve your desired sound.
- Undo/Redo & A/B: As with any professional plugin, Pro-Q 3 includes undo/redo functionality, as well as A/B comparison, making it easy to compare your changes and revert if needed.
Advantages of Using FabFilter Pro-Q 3 for Acoustic EQ
FabFilter Pro-Q 3 offers several advantages for EQing acoustic music. One key advantage is its visual interface, which allows you to see the frequency content of the audio signal in real-time. This makes it easier to identify problem areas and make informed decisions about your EQ settings. The dynamic EQ feature is also incredibly useful for addressing issues that only occur at certain volume levels, such as harshness that only appears when a vocalist sings loudly.
The mid/side processing capabilities of Pro-Q 3 allow you to fine-tune the stereo image of your acoustic recordings. For example, you can use mid/side EQ to widen the stereo image of an acoustic guitar or to reduce the amount of reverb in the side channels. Users consistently report that the clean, transparent sound of Pro-Q 3 is a major benefit, allowing for precise adjustments without introducing unwanted artifacts. Our extensive testing has shown that Pro-Q 3 consistently delivers excellent results on a wide range of acoustic instruments and vocals.
FabFilter Pro-Q 3 Review: A Deep Dive
FabFilter Pro-Q 3 is a powerhouse EQ plugin that offers a blend of surgical precision and musicality. Its intuitive interface, coupled with its advanced features, makes it a go-to choice for both seasoned professionals and aspiring audio engineers. Let’s delve into a comprehensive review of this industry-standard EQ.
User Experience & Usability
Pro-Q 3 boasts a visually appealing and highly intuitive interface. The real-time spectrum analyzer provides instant feedback on the frequency content, making it easy to pinpoint problem areas. Creating and manipulating EQ bands is a breeze, thanks to the drag-and-drop functionality and clear parameter displays. The plugin’s responsiveness is excellent, and the workflow is seamless, allowing you to focus on the sound rather than the technical aspects. Even for beginners, the learning curve is relatively gentle, thanks to the well-designed interface and helpful tooltips. Based on expert consensus, Pro-Q 3 is considered one of the most user-friendly EQ plugins on the market.
Performance & Effectiveness
Pro-Q 3 delivers exceptional performance and effectiveness across a wide range of audio material. Its clean, transparent sound ensures that EQ adjustments are precise and musical, without introducing unwanted artifacts. The dynamic EQ feature is a game-changer for addressing complex dynamic issues, such as taming harshness or controlling resonances. The mid/side processing capabilities provide unparalleled control over the stereo image, allowing you to sculpt the soundstage with precision. In our experience, Pro-Q 3 consistently delivers excellent results, surpassing many other EQ plugins in terms of clarity, precision, and versatility.
Pros
- Intuitive Interface: The visual interface and drag-and-drop functionality make it easy to create and manipulate EQ bands.
- Dynamic EQ: The dynamic EQ feature allows you to address issues that only occur at certain volume levels.
- Mid/Side Processing: The mid/side processing capabilities provide unparalleled control over the stereo image.
- Clean Sound: Pro-Q 3’s transparent sound ensures that EQ adjustments are precise and musical.
- Versatility: Pro-Q 3 is suitable for a wide range of EQ tasks, from surgical precision to broad, musical adjustments.
Cons/Limitations
- CPU Usage: Pro-Q 3 can be CPU-intensive, especially when using multiple instances with linear phase mode enabled.
- Price: Pro-Q 3 is a premium plugin and may be too expensive for some users.
- Learning Curve: While the interface is intuitive, mastering all of Pro-Q 3’s features requires time and effort.
Ideal User Profile
FabFilter Pro-Q 3 is ideal for audio engineers, music producers, and mixing enthusiasts who demand the highest level of precision, control, and sound quality. It’s particularly well-suited for those working with acoustic music, where clarity and transparency are paramount. Pro-Q 3 is also a great choice for users who appreciate a visual workflow and intuitive interface.
Key Alternatives
While FabFilter Pro-Q 3 is a top contender, other excellent EQ plugins include iZotope Ozone EQ and Waves F6 Floating-Band Dynamic EQ. iZotope Ozone EQ offers a similar level of precision and versatility, with the added benefit of being integrated into the Ozone mastering suite. Waves F6 Floating-Band Dynamic EQ is a more affordable option that still provides powerful dynamic EQ capabilities.
Expert Overall Verdict & Recommendation
FabFilter Pro-Q 3 is an exceptional EQ plugin that sets a new standard for precision, versatility, and sound quality. Its intuitive interface, advanced features, and clean sound make it a must-have tool for any serious audio engineer or music producer. While it comes with a premium price tag, the investment is well worth it for those who demand the best. We highly recommend FabFilter Pro-Q 3 to anyone looking to elevate their EQ game.
Mastering Acoustic EQ: The Path to Sonic Excellence
Understanding and applying step by step acoustic music eq settings is a journey, not a destination. By mastering the fundamentals of EQ, experimenting with different techniques, and using powerful tools like FabFilter Pro-Q 3, you can unlock the full potential of your acoustic recordings. The ability to sculpt and refine your sound, address unwanted resonances, and enhance clarity and warmth is a skill that will serve you well throughout your audio engineering career.
Continue to hone your skills, experiment with different instruments and vocal styles, and trust your ears. The world of acoustic music awaits your sonic artistry. Explore our advanced guide to mixing acoustic instruments for more in-depth techniques and insights.
