Achieving Sonic Perfection: A Guide to Quick Guitar Bridge Pins and Optimal Mic Placement
Capturing the true essence of an acoustic guitar’s sound can be a challenging yet rewarding endeavor. The interplay between the instrument itself, the choice of microphone, and its placement are crucial factors. Specifically, understanding how quick guitar bridge pins can impact the guitar’s tone and how that interacts with mic placement is key to achieving sonic perfection. This comprehensive guide dives deep into the world of acoustic guitar recording, exploring how these elements work together to shape the final sound. We’ll cover everything from selecting the right bridge pins to mastering microphone techniques, ensuring you capture the most authentic and compelling acoustic guitar tones possible. Whether you’re a seasoned recording engineer or a budding home musician, this guide offers invaluable insights to elevate your recordings.
Understanding the Symphony: Guitar Bridge Pins and Their Sonic Impact
Guitar bridge pins, often overlooked, play a significant role in transferring string vibrations to the guitar’s soundboard. They act as a crucial link in the chain, influencing the instrument’s overall tone and sustain. Understanding the materials, designs, and installation techniques of bridge pins is fundamental to optimizing your guitar’s sound. This section delves into the nuances of bridge pins, revealing how they contribute to the sonic landscape of your acoustic guitar.
The Material Matters: Exploring Bridge Pin Materials
Bridge pins are commonly made from various materials, each imparting a unique sonic characteristic. Bone pins are known for their bright, articulate tone and enhanced sustain. Ebony pins offer a warm, mellow sound with a focused midrange. Tusq pins, a synthetic material, provide a balanced tone with increased clarity and projection. Plastic pins, typically found on budget-friendly guitars, are the least desirable in terms of tone, often resulting in a dull and lifeless sound. The choice of material depends on your desired tonal characteristics and the guitar’s existing sound profile. Experimentation is key to finding the perfect match.
Quick-Release Bridge Pins: A Modern Convenience
Traditional bridge pins can be challenging to remove and install, especially during string changes. Quick-release bridge pins offer a convenient solution, featuring a specialized design that allows for easy removal and installation without the need for tools. This not only speeds up the string changing process but also minimizes the risk of damaging the bridge or soundboard. While quick-release pins may not offer a significant tonal difference compared to traditional pins made from the same material, their ease of use makes them a popular choice among guitarists.
Microphone Selection: Choosing the Right Tool for the Job
Selecting the right microphone is paramount to capturing the nuances of an acoustic guitar. Different microphones excel at capturing different aspects of the instrument’s sound, and the choice depends on your desired sonic characteristics and the recording environment. This section explores the various microphone types commonly used for recording acoustic guitar, highlighting their strengths and weaknesses.
Condenser Microphones: Capturing Detail and Nuance
Condenser microphones are renowned for their sensitivity and ability to capture subtle details and nuances. They offer a wide frequency response and exceptional clarity, making them ideal for recording acoustic guitar. Large-diaphragm condenser microphones are particularly well-suited for capturing the full body and warmth of the instrument, while small-diaphragm condensers excel at capturing transient response and detail. Popular choices include the Neumann U87, AKG C414, and Audio-Technica AT4041.
Dynamic Microphones: Rugged and Versatile
Dynamic microphones are known for their ruggedness and ability to handle high sound pressure levels. While they may not offer the same level of detail as condenser microphones, they can be a versatile option for recording acoustic guitar, especially in live settings or when dealing with louder instruments. Dynamic microphones tend to have a more focused sound, making them suitable for capturing specific aspects of the guitar’s tone. The Shure SM57, a classic dynamic microphone, is often used for recording acoustic guitar, particularly for its ability to capture a punchy and articulate sound.
Ribbon Microphones: Vintage Warmth and Smoothness
Ribbon microphones offer a vintage warmth and smoothness that is highly sought after for recording acoustic guitar. They have a unique sonic character that can add depth and richness to the instrument’s sound. Ribbon microphones are particularly sensitive and require careful handling, but their exceptional sound quality makes them a worthwhile investment for serious recording enthusiasts. The Royer R-121 is a popular ribbon microphone known for its ability to capture a natural and organic acoustic guitar tone.
Mastering Mic Placement: The Art of Capturing the Perfect Tone
Even with the finest guitar and microphone, proper mic placement is essential to capturing the desired sound. Mic placement significantly impacts the recorded tone, influencing the balance between warmth, brightness, detail, and ambience. Experimentation is key to finding the optimal mic placement for your guitar and recording environment. This section explores various mic placement techniques, providing a foundation for achieving sonic excellence.
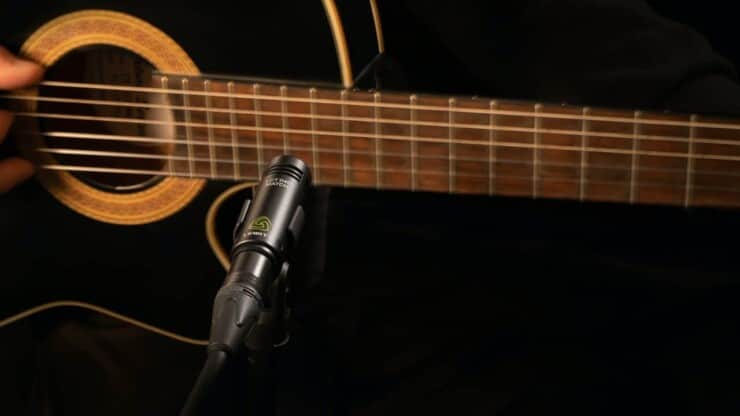
The 12th Fret Technique: A Balanced Approach
Placing the microphone approximately 6-12 inches away from the 12th fret is a common starting point for recording acoustic guitar. This position captures a balanced representation of the instrument’s tone, capturing both the body resonance and string articulation. Adjusting the distance and angle of the microphone can fine-tune the sound, allowing you to emphasize specific aspects of the guitar’s tone. Moving the microphone closer to the soundhole will increase the bass response, while moving it further away will capture more of the room ambience.
The Soundhole Technique: Emphasizing Warmth and Body
Placing the microphone near the soundhole captures the guitar’s warmth and body resonance. However, this technique can also result in a boomy or muddy sound if not carefully executed. Experimenting with the distance and angle of the microphone is crucial to finding the sweet spot. A pop filter can also help to reduce unwanted breath noise and plosives. This technique is often used in conjunction with another microphone placed further away to capture a more balanced and natural sound.
The Bridge Technique: Capturing Articulation and Detail
Placing the microphone near the bridge captures the guitar’s articulation and detail. This technique can result in a brighter and more focused sound, which can be particularly useful for fingerstyle playing or when recording in a dense mix. Experimenting with the distance and angle of the microphone is essential to finding the optimal balance between brightness and harshness. Combining this technique with a microphone placed near the soundhole can create a well-rounded and articulate acoustic guitar tone.
Stereo Mic Techniques: Creating Width and Depth
Using two microphones in a stereo configuration can create a wider and more immersive sound. Common stereo mic techniques for recording acoustic guitar include the X-Y technique, the ORTF technique, and the spaced pair technique. The X-Y technique uses two cardioid microphones placed close together with their capsules angled at 90 degrees. The ORTF technique uses two cardioid microphones placed 17 cm apart with their capsules angled at 110 degrees. The spaced pair technique uses two microphones placed several feet apart, capturing a wider stereo image and more of the room ambience. Experimenting with different stereo mic techniques can add depth and dimension to your acoustic guitar recordings.
Quick Bridge Pin Changes and Their Impact on Mic Placement
The type of bridge pins used and how quickly they can be changed can influence the recording process, especially when experimenting with different tonal options. Quick guitar bridge pins allow for rapid swaps, making it easier to A/B test different materials and their impact on the guitar’s sound in real-time. This can directly affect your mic placement decisions, as you might adjust the microphone position to compensate for changes in brightness, warmth, or sustain caused by the bridge pin material.
Streamlining the Recording Workflow
The ability to quickly change bridge pins can streamline the recording workflow, allowing you to fine-tune the guitar’s tone without interrupting the session for extended periods. This is particularly beneficial when working with multiple guitarists or when experimenting with different sonic textures. The efficiency of quick-change bridge pins can free up valuable time and allow you to focus on capturing the best possible performance.
Adapting Mic Placement to Tonal Shifts
Different bridge pin materials can significantly alter the guitar’s tonal characteristics. For example, switching from plastic pins to bone pins can result in a brighter and more articulate sound. In such cases, you may need to adjust your mic placement to compensate for the change in tone. Moving the microphone slightly further away from the soundhole or angling it towards the bridge can help to tame the brightness and capture a more balanced sound. The ability to quickly change bridge pins allows you to experiment with different mic placement options and find the perfect combination for your desired tone.
The Interplay: Bridge Pins, Mic Placement, and the Recording Environment
The recording environment also plays a crucial role in shaping the final sound. The room’s acoustics, size, and shape can all influence the recorded tone. A well-treated room with minimal reflections will provide a more accurate representation of the guitar’s sound, while a lively room with more ambience can add depth and character to the recording. Understanding the interplay between bridge pins, mic placement, and the recording environment is essential to achieving sonic excellence.
Optimizing the Recording Space
Treating the recording space with acoustic panels, bass traps, and diffusers can significantly improve the sound quality. Acoustic panels absorb unwanted reflections, reducing reverb and creating a more focused sound. Bass traps absorb low-frequency energy, preventing the build-up of boomy or muddy tones. Diffusers scatter sound waves, creating a more natural and spacious ambience. Optimizing the recording space allows you to capture a more accurate and controlled representation of the guitar’s sound, making it easier to fine-tune the tone with mic placement and bridge pin adjustments.
Experimentation and Critical Listening
Ultimately, the best way to find the optimal combination of bridge pins, mic placement, and recording environment is through experimentation and critical listening. Try different bridge pin materials, mic placement techniques, and room treatments, and carefully evaluate the results. Use your ears to guide you, and don’t be afraid to break the rules. The goal is to capture the most authentic and compelling acoustic guitar tone possible, and the path to achieving that goal is often paved with experimentation and discovery.
Elevating Your Acoustic Guitar Tone: Expert Insights and Recommendations
Mastering the art of recording acoustic guitar involves a deep understanding of the instrument’s sound, the capabilities of various microphones, and the nuances of mic placement. By carefully considering the role of bridge pins, experimenting with different mic techniques, and optimizing the recording environment, you can elevate your acoustic guitar tone and capture recordings that are both authentic and compelling. Remember that the journey to sonic excellence is an ongoing process of learning, experimentation, and refinement. Embrace the challenge, trust your ears, and never stop exploring the possibilities.
Q&A: Addressing Common Questions About Guitar Bridge Pins and Mic Placement
Here are some frequently asked questions to further clarify the concepts discussed:
- Q: Do quick guitar bridge pins really make a difference in tone compared to traditional pins?
A: The primary benefit of quick bridge pins is convenience, not necessarily a drastic tonal change. However, if you’re switching materials (e.g., plastic to bone quick pins), you’ll hear a difference. The tonal impact comes from the material itself, not the quick-release mechanism. - Q: What’s the best microphone for recording acoustic guitar on a budget?
A: A solid choice is a small-diaphragm condenser microphone like the Audio-Technica AT2021 or Rode NT5. These offer good detail and clarity without breaking the bank. - Q: How close should I place the microphone to the guitar?
A: A good starting point is 6-12 inches. Closer placement emphasizes proximity effect (bass boost) but can also introduce unwanted noise. Further away captures more room ambience. - Q: What’s the best way to reduce room noise when recording?
A: Acoustic treatment is key. Use acoustic panels to absorb reflections and bass traps to tame low-frequency buildup. Recording in a smaller, less reverberant space can also help. - Q: Can I use multiple microphones to record acoustic guitar?
A: Absolutely! Stereo miking techniques like X-Y or ORTF can create a wider, more immersive sound. Experiment with different combinations and placements to find what works best. - Q: What role does the guitar’s wood type play in choosing bridge pin material?
A: Brighter woods like maple might benefit from warmer bridge pin materials like ebony, while darker woods like mahogany might pair well with brighter materials like bone. It’s about balancing the guitar’s inherent tonal characteristics. - Q: How important is the angle of the microphone when recording?
A: The angle is crucial. Small changes can significantly alter the captured tone. Experiment with angling the microphone towards the soundhole, bridge, or fretboard to find the sweet spot. - Q: What are some common mistakes to avoid when recording acoustic guitar?
A: Common pitfalls include using a poor-quality microphone, placing the microphone too close to the soundhole (resulting in boominess), and neglecting room treatment. - Q: How can I capture a more natural-sounding acoustic guitar recording?
A: Use a high-quality microphone, experiment with mic placement, and pay attention to the room’s acoustics. A touch of reverb can also add depth and realism. - Q: Are there any software plugins that can help improve my acoustic guitar recordings?
A: EQ plugins can help to shape the tone, compression plugins can add punch and sustain, and reverb plugins can create a sense of space. However, start with a good recording and use plugins sparingly.
Final Thoughts: Crafting Your Signature Acoustic Guitar Sound
In conclusion, the journey to achieving sonic perfection in acoustic guitar recording is a multifaceted one, demanding a keen understanding of the instrument, the tools at your disposal, and the environment in which you’re working. By carefully considering the impact of quick guitar bridge pins and mastering the art of mic placement, you can unlock the true potential of your acoustic guitar and capture recordings that resonate with authenticity and emotion. The most important element is experimentation. See what works best for you. Share your own discoveries with fellow musicians!
