
Dialing In Your Tone: Acoustic Amp EQ Settings Without a Capo
Many acoustic guitarists rely on a capo to change the key of a song or to simplify chord voicings. But what happens when you want to play without one? Achieving a balanced, pleasing tone from your acoustic amplifier becomes even more critical. This comprehensive guide delves into the art and science of no capo acoustic amp EQ settings, offering practical strategies, expert insights, and actionable tips to help you unlock your guitar’s full potential. Whether you’re a seasoned performer or just starting your acoustic journey, mastering EQ without a capo will significantly enhance your sound and versatility.
This article goes beyond basic EQ adjustments. We’ll explore the nuances of different acoustic guitars, pickups, amplifiers, and playing styles. You’ll learn how to identify problem frequencies, sculpt your tone for various musical genres, and ultimately, create a signature sound that’s uniquely yours. Get ready to take control of your acoustic tone and discover the freedom of playing without a capo, all while sounding your absolute best.
Understanding Acoustic Guitar Frequencies and EQ
Before diving into specific EQ settings, it’s crucial to understand the frequency ranges of an acoustic guitar and how they contribute to the overall tone. Each frequency band plays a distinct role, and knowing how to manipulate them is key to achieving your desired sound.
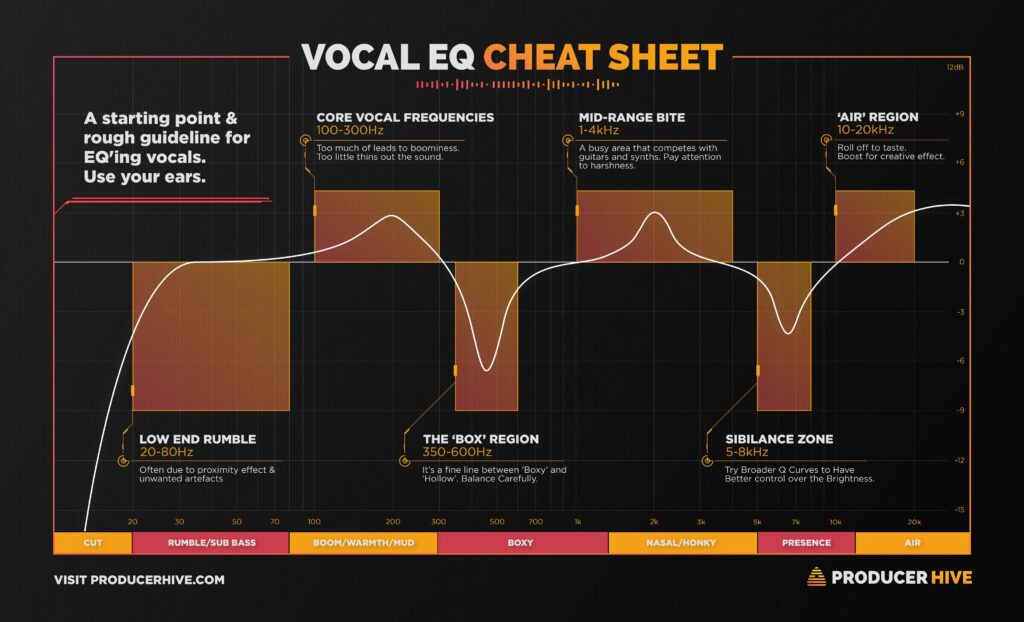
- Sub-Bass (20-60 Hz): These frequencies are felt more than heard. They can add depth but often result in muddiness if overemphasized, especially in smaller rooms.
- Bass (60-250 Hz): This range provides the fundamental body and warmth of the guitar. Too much bass can sound boomy, while too little can make the guitar sound thin and weak.
- Low-Midrange (250-500 Hz): This area contributes to the guitar’s fullness and note definition. Careful adjustments here can help to avoid a boxy or muddy sound.
- Midrange (500 Hz – 2 kHz): The midrange is where the guitar’s core character resides. It affects clarity, projection, and overall presence. Overemphasis can sound harsh or nasal, while underemphasis can make the guitar sound distant.
- High-Midrange (2 kHz – 4 kHz): This range adds brightness and articulation. It’s crucial for fingerstyle playing and ensuring that notes cut through a mix. Too much can cause harshness or a brittle sound.
- Treble (4 kHz – 8 kHz): These frequencies contribute to airiness and sparkle. They affect the clarity of harmonics and the overall shimmer of the guitar. Overemphasis can sound hissy or shrill.
- Air (8 kHz – 20 kHz): The very highest frequencies add a sense of openness and space. Subtle adjustments can enhance the realism of the guitar’s tone.
Understanding these frequency ranges is the foundation for effective EQ. By listening critically and identifying which frequencies need adjustment, you can sculpt your tone to perfection.
The Role of Acoustic Amplifiers and Pickups
Acoustic amplifiers are designed to amplify the natural sound of your guitar without adding unwanted coloration. However, the amplifier’s EQ section plays a vital role in shaping the final tone. Different amplifiers have different EQ circuits, so it’s important to understand how yours works.
The choice of pickup also significantly impacts your EQ settings. There are several types of acoustic guitar pickups, each with its own sonic characteristics:
- Piezo Pickups: These are the most common type, known for their bright, articulate sound. They often require some EQ to tame harshness and add warmth.
- Magnetic Soundhole Pickups: These pickups capture the string vibrations directly, resulting in a warmer, more electric-guitar-like tone. They may require less EQ than piezo pickups.
- Microphone Pickups: These pickups use a small microphone to capture the acoustic sound of the guitar. They offer a more natural and balanced tone but can be prone to feedback.
- Hybrid Systems: These systems combine multiple pickup types to capture a wider range of frequencies and sonic nuances. They often require more complex EQ settings to blend the different signals effectively.
The interaction between your pickup and amplifier is crucial. Experiment with different combinations to find what works best for your guitar and playing style. A high-quality pickup and amplifier will give you a solid foundation for crafting your ideal tone.
Essential EQ Techniques for Capo-less Acoustic Playing
Playing without a capo often requires different EQ settings than when using one. The absence of the capo shifts the tonal balance of the guitar, requiring adjustments to compensate.
Compensating for Lost Brightness
When you remove the capo, you effectively shorten the scale length of the guitar, which can result in a loss of brightness and clarity. To compensate, try these EQ adjustments:
- Slightly boost the high-midrange (2 kHz – 4 kHz): This will add articulation and help the notes cut through.
- Add a touch of treble (4 kHz – 8 kHz): This will enhance the airiness and sparkle of the guitar.
- Be careful not to overdo it: Too much high-end boost can result in a harsh or brittle sound.
Addressing Boominess in the Low End
Without a capo, the open strings resonate more freely, which can lead to boominess in the low end. To address this, try these EQ adjustments:
- Cut the bass frequencies (60-250 Hz): This will reduce the overall boominess and create a more balanced sound.
- Use a high-pass filter: A high-pass filter rolls off the frequencies below a certain point, effectively removing unwanted low-end rumble.
- Experiment with different microphone positions: If you’re using a microphone pickup, try moving it slightly away from the soundhole to reduce bass response.
Sculpting the Midrange for Clarity
The midrange is crucial for clarity and note definition. When playing without a capo, it’s important to ensure that the midrange is well-balanced. Try these EQ adjustments:
- Cut the low-midrange (250-500 Hz): This can help to reduce muddiness and improve note separation.
- Boost the midrange (500 Hz – 2 kHz): This will add presence and help the guitar cut through the mix.
- Be careful not to overdo it: Too much midrange can sound harsh or nasal.
Advanced EQ Strategies for Acoustic Guitar
Once you’ve mastered the basic EQ techniques, you can explore more advanced strategies to fine-tune your tone.
Using Parametric EQ
Parametric EQ allows you to precisely control the frequency, bandwidth (Q), and gain of each EQ band. This gives you greater flexibility in shaping your tone.
- Frequency: Select the exact frequency you want to adjust.
- Bandwidth (Q): Control the width of the frequency range affected by the EQ. A narrow Q affects a small range, while a wide Q affects a larger range.
- Gain: Adjust the amount of boost or cut applied to the selected frequency.
Parametric EQ is particularly useful for surgically removing unwanted frequencies or boosting specific frequencies for maximum impact. Experiment with different settings to discover the power of parametric EQ.
Multi-Band Compression
Multi-band compression divides the audio spectrum into multiple frequency bands and applies compression to each band independently. This allows you to control the dynamics of different frequency ranges, resulting in a more balanced and polished sound.
- Tame harsh high frequencies: Use compression to reduce the dynamic range of the high frequencies, preventing them from sounding harsh or brittle.
- Add punch to the low end: Use compression to increase the sustain and impact of the bass frequencies.
- Control the midrange dynamics: Use compression to smooth out the midrange and prevent it from sounding muddy or harsh.
Multi-band compression is a powerful tool for shaping the overall dynamics of your acoustic guitar tone. It requires careful adjustment, but the results can be stunning.
Notch Filtering for Feedback Control
Feedback can be a common problem when playing acoustic guitar through an amplifier, especially at higher volumes. Notch filters are narrow-band EQ cuts that can be used to eliminate specific frequencies that are causing feedback.
- Identify the feedback frequency: Use your ears or a spectrum analyzer to identify the frequency that’s causing the feedback.
- Apply a narrow notch filter: Set the frequency of the notch filter to the feedback frequency and use a narrow Q to minimize the impact on the surrounding frequencies.
- Adjust the gain: Gradually reduce the gain of the notch filter until the feedback is eliminated.
Notch filters are an essential tool for controlling feedback and maintaining a clean, clear sound.
Acoustic Amp EQ Settings for Different Guitar Types
The ideal EQ settings for your acoustic amplifier will vary depending on the type of guitar you’re using. Different woods, body sizes, and construction techniques all contribute to the guitar’s overall tone.
Dreadnought Guitars
Dreadnought guitars are known for their powerful bass response and balanced tone. They typically require less bass boost and more midrange shaping.
- Cut the bass slightly (60-250 Hz): To prevent boominess.
- Boost the midrange (500 Hz – 2 kHz): To add clarity and projection.
- Add a touch of treble (4 kHz – 8 kHz): To enhance the airiness and sparkle.
Grand Auditorium Guitars
Grand auditorium guitars offer a more balanced tone than dreadnoughts, with a slightly smaller body size. They typically require less EQ overall.
- Make subtle adjustments to the bass, midrange, and treble: To fine-tune the tone to your liking.
- Pay attention to the high-midrange (2 kHz – 4 kHz): To ensure clarity and articulation.
Parlor Guitars
Parlor guitars are smaller-bodied guitars with a more focused and intimate tone. They often require more bass boost to compensate for their smaller size.
- Boost the bass (60-250 Hz): To add warmth and body.
- Cut the low-midrange (250-500 Hz): To reduce boxiness.
- Add a touch of treble (4 kHz – 8 kHz): To enhance the airiness and sparkle.
Acoustic Amp EQ Settings for Various Playing Styles
Your playing style also influences the ideal EQ settings for your acoustic amplifier. Fingerstyle players typically require different EQ settings than strumming players.
Fingerstyle Playing
Fingerstyle playing emphasizes clarity and articulation. To achieve this, try these EQ adjustments:
- Boost the high-midrange (2 kHz – 4 kHz): To enhance note definition and clarity.
- Cut the low-midrange (250-500 Hz): To reduce muddiness and improve note separation.
- Add a touch of treble (4 kHz – 8 kHz): To enhance the airiness and sparkle of the harmonics.
Strumming
Strumming emphasizes rhythm and power. To achieve this, try these EQ adjustments:
- Boost the bass (60-250 Hz): To add warmth and body to the chords.
- Cut the low-midrange (250-500 Hz): To prevent muddiness.
- Add a touch of treble (4 kHz – 8 kHz): To enhance the overall brightness and clarity.
Product Spotlight: Fishman Loudbox Mini Charge
When it comes to acoustic amplification, the Fishman Loudbox Mini Charge stands out as a top-tier option, especially when aiming for optimal no capo acoustic amp EQ settings. This amplifier delivers exceptional clarity, portability, and versatility, making it a favorite among professional acoustic guitarists. Its compact design doesn’t compromise on sound quality, offering a rich and balanced tone that accurately represents the nuances of your instrument.
The Loudbox Mini Charge is not just an amplifier; it’s a complete acoustic solution. Its built-in rechargeable battery allows for hours of unplugged performance, making it ideal for gigs in any location. The amp also features two channels, one for your guitar and one for a microphone, allowing you to perform vocals or connect other instruments. The onboard effects, including reverb and chorus, add depth and dimension to your sound, while the three-band EQ provides precise control over your tone.
Detailed Feature Analysis of the Fishman Loudbox Mini Charge
The Fishman Loudbox Mini Charge is packed with features designed to enhance your acoustic playing experience. Here’s a breakdown of some of its key features:
- Two Channels: The amp features two independent channels, one for your guitar and one for a microphone. This allows you to perform vocals or connect other instruments without the need for a separate mixer.
- Three-Band EQ: Each channel has its own three-band EQ (bass, middle, and treble), providing precise control over your tone. This allows you to shape the sound of your guitar and vocals independently.
- Reverb and Chorus Effects: The amp includes built-in reverb and chorus effects, adding depth and dimension to your sound. These effects can be applied to either channel or both channels simultaneously.
- Bluetooth Connectivity: The Loudbox Mini Charge features Bluetooth connectivity, allowing you to stream backing tracks or play music from your smartphone or tablet.
- Rechargeable Battery: The amp’s built-in rechargeable battery provides up to 12 hours of unplugged performance, making it ideal for gigs in any location.
- Lightweight and Portable: The Loudbox Mini Charge is incredibly lightweight and portable, making it easy to transport to gigs or rehearsals.
- XLR DI Output: The amp features an XLR DI output, allowing you to connect it directly to a PA system or recording console.
These features combine to make the Fishman Loudbox Mini Charge a versatile and powerful acoustic amplifier that’s perfect for any situation.
Advantages and Real-World Value of the Loudbox Mini Charge
The Fishman Loudbox Mini Charge offers numerous advantages and real-world value for acoustic guitarists. Here are some of the key benefits:
- Exceptional Sound Quality: The amp delivers a clear, balanced, and natural sound that accurately represents the nuances of your acoustic guitar.
- Portability and Convenience: The amp’s lightweight design and rechargeable battery make it incredibly portable and convenient to use in any location.
- Versatility: The amp’s two channels, effects, and Bluetooth connectivity make it a versatile tool for performing, practicing, and recording.
- Ease of Use: The amp is easy to set up and use, even for beginners. The intuitive controls and clear layout make it simple to dial in your desired tone.
- Reliability: Fishman is a trusted brand known for producing high-quality and reliable acoustic amplification products.
Users consistently report that the Loudbox Mini Charge enhances their acoustic playing experience and provides exceptional value for the price. Its portability, versatility, and sound quality make it a top choice for acoustic guitarists of all levels.
Comprehensive Review: Fishman Loudbox Mini Charge
The Fishman Loudbox Mini Charge is a stellar acoustic amplifier that punches well above its weight class. Its combination of portability, sound quality, and features makes it a top contender for acoustic guitarists seeking a versatile and reliable amplification solution.
From a user experience perspective, the Loudbox Mini Charge is incredibly intuitive. The controls are clearly labeled and easy to adjust, making it simple to dial in your desired tone. The amp’s lightweight design and built-in rechargeable battery make it a breeze to transport to gigs or rehearsals.
In terms of performance, the Loudbox Mini Charge delivers exceptional clarity and balance. The amp accurately reproduces the nuances of your acoustic guitar, allowing your instrument’s natural tone to shine through. The built-in effects add depth and dimension to your sound, while the three-band EQ provides precise control over your tone.
Pros:
- Exceptional Sound Quality: The amp delivers a clear, balanced, and natural sound.
- Portability: The amp’s lightweight design and rechargeable battery make it incredibly portable.
- Versatility: The amp’s two channels, effects, and Bluetooth connectivity make it a versatile tool.
- Ease of Use: The amp is easy to set up and use, even for beginners.
- Reliability: Fishman is a trusted brand known for producing high-quality products.
Cons:
- Limited Power: The amp’s 60 watts of power may not be sufficient for larger venues.
- No Phantom Power: The microphone channel does not provide phantom power, limiting your choice of microphones.
- Price: The Loudbox Mini Charge is more expensive than some other acoustic amplifiers in its class.
- Plastic Construction: While durable, the amp’s plastic construction may not appeal to some users.
Ideal User Profile:
The Fishman Loudbox Mini Charge is best suited for acoustic guitarists who need a portable, versatile, and reliable amplification solution. It’s ideal for small to medium-sized venues, coffee shops, and home practice. It’s also a great choice for singer-songwriters who need to amplify both their guitar and vocals.
Key Alternatives:
Two main alternatives to the Fishman Loudbox Mini Charge are the Roland AC-33 and the Fender Acoustasonic 40. The Roland AC-33 offers a similar feature set with a focus on battery-powered operation, while the Fender Acoustasonic 40 provides a more affordable option with a slightly different tonal character.
Expert Overall Verdict & Recommendation:
The Fishman Loudbox Mini Charge is an excellent acoustic amplifier that offers exceptional sound quality, portability, and versatility. While it may not be the perfect choice for every situation, it’s a top contender for acoustic guitarists who need a reliable and high-performing amplification solution. We highly recommend the Loudbox Mini Charge to any acoustic guitarist looking to elevate their sound.
Crafting Your Signature Sound: The Art of Acoustic EQ
Mastering no capo acoustic amp eq settings is an ongoing journey of experimentation and refinement. By understanding the frequency ranges of your guitar, the characteristics of your amplifier and pickups, and the nuances of your playing style, you can unlock your instrument’s full potential and create a signature sound that’s uniquely yours. Remember to always listen critically, make small adjustments, and trust your ears. With practice and patience, you’ll become a master of acoustic EQ and take your playing to the next level.
If you want to learn more, explore our detailed guide to acoustic pickup installation and optimization. Share your experiences with no capo acoustic amp eq settings in the comments below!
