Unlock Studio-Quality Sound: The Ultimate Guide to Updating Acoustic Cover EQ Settings
Creating a captivating acoustic cover hinges on more than just raw talent; it demands meticulous attention to detail in the post-production process. One of the most critical aspects is equalization (EQ), and understanding how to update acoustic cover EQ settings is paramount to achieving a polished, professional sound. This comprehensive guide delves deep into the art and science of EQ for acoustic covers, providing you with the knowledge and techniques to transform your recordings from amateur to exceptional.
We’ll explore the fundamental principles of EQ, dissect common frequency ranges and their impact on acoustic instruments and vocals, and provide practical, step-by-step instructions for tailoring your EQ settings to achieve a balanced, warm, and engaging acoustic cover. Whether you’re a seasoned audio engineer or a budding musician, this guide will equip you with the skills to master the art of acoustic cover EQ.
Understanding the Foundations of Acoustic Cover EQ
Equalization is the process of adjusting the frequency content of an audio signal. It allows you to shape the sonic characteristics of your recording, boosting or cutting specific frequencies to enhance clarity, warmth, and overall balance. In the context of acoustic covers, effective EQ is crucial for separating instruments in the mix, taming unwanted resonances, and creating a cohesive and pleasing sonic landscape.
Core Concepts of EQ
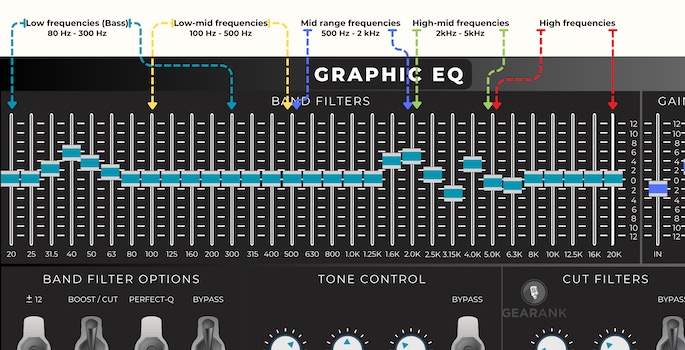
EQ operates by manipulating the amplitude of different frequencies within the audio spectrum. The human ear typically perceives frequencies from 20 Hz to 20 kHz. EQ plugins and hardware devices divide this spectrum into various bands, each representing a range of frequencies that can be adjusted independently.
- Frequency: Measured in Hertz (Hz), frequency represents the number of cycles per second of a sound wave. Lower frequencies correspond to bass tones, while higher frequencies correspond to treble tones.
- Amplitude: Measured in decibels (dB), amplitude represents the loudness or intensity of a sound wave. Boosting a frequency increases its amplitude, while cutting a frequency decreases its amplitude.
- Bandwidth (Q): Bandwidth determines the width of the frequency range affected by an EQ adjustment. A narrow bandwidth (high Q) affects a small range of frequencies, while a wide bandwidth (low Q) affects a broader range of frequencies.
- Gain: Gain refers to the amount of boost or cut applied to a specific frequency band, measured in decibels (dB).
The Importance of EQ in Acoustic Covers
Acoustic instruments, such as guitars, pianos, and vocals, produce a wide range of frequencies. Without proper EQ, these frequencies can clash, resulting in a muddy, unclear mix. EQ allows you to sculpt each instrument’s sonic character, creating space and separation within the mix. Furthermore, EQ can be used to address specific issues, such as harshness in the high frequencies or muddiness in the low frequencies.
Tools of the Trade: EQ Plugins and Hardware
Numerous EQ plugins and hardware devices are available for shaping the sound of your acoustic covers. These tools offer varying features and sonic characteristics, catering to different preferences and budgets.
Popular EQ Plugins
- FabFilter Pro-Q 3: A highly versatile and transparent EQ plugin renowned for its precision and flexibility. It offers a wide range of features, including dynamic EQ, mid/side processing, and spectrum analysis.
- Waves SSL E-Channel: A faithful recreation of the classic SSL 4000 E-Series console EQ. It delivers a punchy and characterful sound, ideal for adding warmth and aggression to your acoustic covers.
- iZotope Ozone EQ: Part of the Ozone mastering suite, this EQ plugin offers a clean and precise sound, with a user-friendly interface and a variety of helpful features, such as visual mixing and assistant tools.
- TDR Nova: A free, parallel dynamic equalizer. Appearing to be simple at first glance, it is able to cover an impressively wide range of applications. Whether it be a subtle vocal shaping, or a complete reshaping of an instrument’s timbre.
Hardware EQs
While plugins offer convenience and affordability, hardware EQs provide a unique sonic character and tactile control. Many professional studios rely on hardware EQs for their warmth, depth, and ability to impart a subtle analog flavor to recordings.
- Pultec EQP-1A: A legendary tube EQ known for its smooth and musical sound. It’s particularly effective for adding warmth and air to vocals and acoustic instruments.
- API 550A: A classic EQ with a punchy and aggressive sound. It’s often used on drums, guitars, and other instruments that require a more upfront and assertive tone.
- Neve 1073: A highly sought-after preamp and EQ module known for its warm, rich, and detailed sound. It’s a versatile tool that can be used on a wide range of sources.
Acoustic Guitar EQ: Sculpting the Perfect Tone
The acoustic guitar is a cornerstone of many acoustic covers, and proper EQ is essential for capturing its natural warmth and clarity. The ideal EQ settings will vary depending on the guitar’s make, model, and the recording environment, but some general guidelines can help you get started.
Addressing Common Acoustic Guitar Issues
- Boomy Low End: Acoustic guitars can often exhibit excessive low-frequency buildup, resulting in a muddy and indistinct sound. To address this, try using a high-pass filter to remove frequencies below 80-100 Hz.
- Boxy Midrange: The midrange frequencies (200-500 Hz) can sometimes sound boxy or muffled. Try cutting a few decibels in this range to improve clarity and definition.
- Harsh High Frequencies: The high frequencies (2 kHz and above) can sometimes sound harsh or brittle, especially when using condenser microphones. Try gently rolling off the high frequencies or using a de-esser to tame any harshness.
EQ Tips for Acoustic Guitar
- Start with Subtlety: Make small, incremental adjustments to the EQ. Over-EQing can quickly lead to an unnatural and artificial sound.
- Use a High-Pass Filter: A high-pass filter is an essential tool for removing unwanted low-frequency rumble and boominess.
- Sweep for Problem Frequencies: Use a narrow bandwidth and boost the EQ gain to identify problem frequencies. Once you’ve found a frequency that sounds unpleasant, cut it gently.
- Consider the Context: The ideal EQ settings for an acoustic guitar will depend on the other instruments in the mix. Make sure to listen to the guitar in the context of the full mix to ensure that it sits well.
Vocal EQ: Achieving Clarity and Presence
The vocals are often the focal point of an acoustic cover, and proper EQ is critical for ensuring that they are clear, present, and emotionally engaging. Vocal EQ can be a delicate process, as it’s easy to over-EQ and create an unnatural or processed sound.
Addressing Common Vocal Issues
- Muddy Low End: Vocals can sometimes exhibit excessive low-frequency buildup, particularly in male vocals. Use a high-pass filter to remove frequencies below 80-120 Hz.
- Nasal Midrange: The midrange frequencies (500 Hz – 1 kHz) can sometimes sound nasal or honky. Try cutting a few decibels in this range to improve clarity and openness.
- Sibilance: Sibilance refers to the harsh “s” and “t” sounds that can sometimes occur in vocals. Use a de-esser to tame sibilance and create a smoother, more pleasant sound.
EQ Tips for Vocals
- Use a High-Pass Filter: A high-pass filter is essential for removing unwanted low-frequency rumble and boominess.
- Boost the High Frequencies for Air: A gentle boost in the high frequencies (10 kHz and above) can add air and sparkle to vocals.
- Cut Harsh Frequencies: Use a narrow bandwidth and sweep for harsh frequencies. Once you’ve found a frequency that sounds unpleasant, cut it gently.
- Consider the Vocalist’s Voice: The ideal EQ settings for vocals will depend on the vocalist’s voice and the style of music. Experiment with different EQ settings to find what works best.
Beyond the Basics: Advanced EQ Techniques
Once you’ve mastered the fundamentals of EQ, you can explore more advanced techniques to further enhance your acoustic covers.
Dynamic EQ
Dynamic EQ allows you to apply EQ adjustments that vary depending on the level of the audio signal. This can be useful for addressing issues that only occur at certain times, such as sibilance in vocals or boominess in acoustic guitars. For example, you can use a dynamic EQ to automatically reduce the level of sibilant frequencies whenever they become too prominent.
Mid/Side EQ
Mid/side EQ allows you to EQ the mid (center) and side (stereo) channels of your audio separately. This can be useful for widening the stereo image of your acoustic cover or for addressing issues that are specific to the mid or side channels. For example, you can use mid/side EQ to boost the high frequencies in the side channels, creating a wider and more spacious sound.
Parallel EQ
Parallel EQ involves creating a copy of your audio signal and applying EQ to the copy separately. You can then blend the EQ’d copy with the original signal to create a more subtle and nuanced EQ effect. This technique is often used to add warmth, punch, or air to vocals and acoustic instruments.
Practical Examples: Update Acoustic Cover EQ Settings in Action
Let’s consider a practical example: you’ve recorded an acoustic cover of a popular song, but the guitar sounds muddy and the vocals lack presence. Here’s how you might approach updating the EQ settings:
- Acoustic Guitar: Start by applying a high-pass filter at 80 Hz to remove any unwanted low-frequency rumble. Then, use a narrow bandwidth and sweep the midrange frequencies (200-500 Hz) to identify any boxy or muffled frequencies. Cut these frequencies gently. Finally, add a subtle boost at 2-4 kHz to enhance the guitar’s clarity and articulation.
- Vocals: Apply a high-pass filter at 100 Hz to remove any unwanted low-frequency rumble. Use a de-esser to tame any sibilance. Add a gentle boost at 3-5 kHz to enhance the vocals’ presence and intelligibility. Experiment with a slight boost in the high frequencies (10 kHz and above) to add air and sparkle.
Elevating Your Acoustic Covers Through Precise EQ
Mastering the art of update acoustic cover EQ settings is an ongoing journey, but with a solid understanding of the fundamentals, the right tools, and a keen ear, you can transform your recordings into polished, professional-sounding acoustic covers. Remember to start with subtlety, listen carefully, and always consider the context of the full mix. With practice and patience, you’ll be able to sculpt your acoustic covers to perfection, captivating your audience and showcasing your musical talent.
