Mastering Advanced Acoustic Tabs EQ Settings: A Comprehensive Guide
Are you ready to unlock the full potential of your acoustic instrument recordings? Achieving pristine, professional-sounding acoustic tracks often hinges on mastering the art of equalization (EQ). While basic EQ techniques are widely known, truly exceptional acoustic recordings require a deeper understanding of frequency sculpting, especially when working with acoustic tabs. This comprehensive guide delves into advanced acoustic tabs EQ settings, providing you with the knowledge and techniques to elevate your recordings from amateur to polished and professional. We’ll explore the nuances of EQing different acoustic instruments, common pitfalls to avoid, and proven strategies for achieving optimal sonic clarity and balance.
Understanding the Foundations of Acoustic EQ
Before diving into advanced techniques, it’s crucial to solidify your understanding of fundamental EQ principles. Equalization is the process of adjusting the amplitude of different frequencies in an audio signal. This allows you to shape the tonal character of an instrument or vocal, correct imbalances, and enhance specific aspects of the sound. For acoustic instruments, EQ plays a vital role in mitigating unwanted resonances, controlling muddiness, and bringing out the natural warmth and brilliance.
Key frequency ranges to be aware of when EQing acoustic instruments include:
- Low Frequencies (Below 250 Hz): These frequencies contribute to the body and warmth of the instrument. Excessive boost in this range can lead to muddiness, while excessive cut can make the instrument sound thin and lifeless.
- Mid Frequencies (250 Hz – 4 kHz): This is where the fundamental frequencies of most acoustic instruments reside. Careful EQing in this range can improve clarity, definition, and presence. However, excessive boosts in the mid-range can sound harsh or nasal.
- High Frequencies (Above 4 kHz): These frequencies contribute to the brightness, air, and detail of the instrument. Boosting the high frequencies can add sparkle and clarity, but excessive boosts can also introduce unwanted hiss or harshness.
Understanding these frequency ranges is paramount to achieving effective acoustic tabs EQ settings. Remember, every instrument is unique, and the ideal EQ settings will vary depending on the instrument, the recording environment, and the desired sonic outcome.
The Role of Acoustic Tabs in EQing
Acoustic tabs, or acoustic impulse responses, are digital representations of the acoustic characteristics of a space. They are often used in convolution reverbs to simulate the sound of recording in different environments. When working with acoustic tabs, EQ becomes even more critical because the tabs themselves can introduce unwanted colorations or resonances into the signal.
Therefore, it’s often necessary to use EQ to correct these imperfections and achieve a more natural and balanced sound. This involves carefully analyzing the frequency response of the acoustic tab and identifying any problem areas that need to be addressed. For example, if the tab introduces a muddy low-end, you might need to use a high-pass filter or a gentle cut in the low frequencies to clean up the sound.
Advanced EQ Techniques for Acoustic Instruments
Now that we’ve covered the basics, let’s explore some advanced EQ techniques that can take your acoustic recordings to the next level:
- Notch Filtering: This technique involves using narrow, deep cuts to eliminate specific resonant frequencies. It’s particularly useful for removing unwanted hums, buzzes, or ringing sounds that can plague acoustic recordings.
- Dynamic EQ: Unlike static EQ, which applies the same EQ settings at all times, dynamic EQ adjusts the EQ settings based on the input signal. This allows you to address frequency problems that only occur at certain points in the performance. For example, you could use dynamic EQ to automatically reduce the level of a resonant frequency when the instrument is played loudly.
- Parallel EQ: This technique involves splitting the audio signal into two paths, applying different EQ settings to each path, and then blending the two signals back together. This can be a powerful way to add subtle enhancements or corrections without drastically altering the overall sound.
- Mid-Side EQ: Mid-side EQ allows you to EQ the mid (center) and side (stereo) channels of a recording independently. This can be useful for widening or narrowing the stereo image, or for addressing frequency problems that are specific to the mid or side channels.
These advanced techniques require careful listening and experimentation, but they can yield impressive results when applied correctly. Remember to always use your ears and trust your judgment.
EQing Different Acoustic Instruments: Specific Strategies
Each acoustic instrument has its own unique sonic characteristics and challenges when it comes to EQing. Here are some specific strategies for common acoustic instruments:
Acoustic Guitar EQ Settings
Acoustic guitars often benefit from a gentle boost in the high frequencies to add sparkle and clarity. However, be careful not to overdo it, as this can introduce harshness. It’s also important to address any muddiness in the low-end, which can be caused by resonant frequencies in the guitar’s body. A high-pass filter or a gentle cut in the low frequencies can help clean up the sound.
Acoustic Piano EQ Settings
Acoustic pianos can be challenging to EQ because they have such a wide frequency range. The key is to focus on clarity and balance. A gentle boost in the high frequencies can add brightness, while a gentle cut in the low-mid frequencies can reduce muddiness. It’s also important to address any harshness in the upper mid-range, which can be caused by the piano’s hammers hitting the strings.
Acoustic Vocals EQ Settings
Acoustic vocals often benefit from a gentle boost in the high frequencies to add air and presence. However, be careful not to overdo it, as this can introduce sibilance (harsh “s” sounds). It’s also important to address any muddiness in the low-mid frequencies, which can make the vocals sound muffled. A high-pass filter can help clean up the sound.
Common EQ Mistakes to Avoid
Even experienced engineers can fall victim to common EQ mistakes. Here are some pitfalls to avoid:
- Over-EQing: Applying too much EQ can make the sound unnatural and artificial. It’s always better to start with subtle adjustments and gradually increase the amount of EQ until you achieve the desired result.
- EQing in Isolation: Always listen to the instrument in the context of the entire mix. What sounds good in isolation may not sound good in the mix.
- Ignoring the Source: No amount of EQ can fix a poorly recorded instrument. It’s always best to start with a good-sounding source and use EQ to enhance its natural qualities.
- Relying on Presets: While presets can be a good starting point, they are not a substitute for careful listening and experimentation. Every instrument is unique, and the ideal EQ settings will vary depending on the specific instrument and recording environment.
By avoiding these common mistakes, you’ll be well on your way to achieving professional-sounding acoustic recordings.
FabFilter Pro-Q 3: A Powerful EQ Tool for Acoustic Instruments
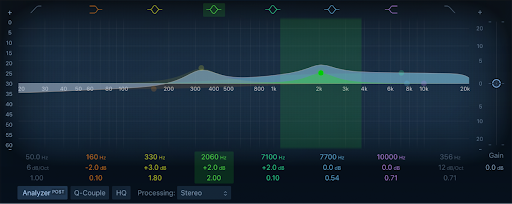
When it comes to EQ plugins, FabFilter Pro-Q 3 is a top choice for many professional engineers. Its intuitive interface, powerful features, and pristine sound quality make it an ideal tool for shaping the sonic character of acoustic instruments. Pro-Q 3 offers a wide range of EQ types, including bell, shelf, high-pass, low-pass, and notch filters. It also features a spectrum analyzer that allows you to visually identify problem frequencies.
One of the most powerful features of Pro-Q 3 is its dynamic EQ capabilities. This allows you to adjust the EQ settings based on the input signal, which is particularly useful for addressing frequency problems that only occur at certain points in the performance. Pro-Q 3 also offers mid-side EQ, which allows you to EQ the mid and side channels of a recording independently.
Detailed Feature Analysis of FabFilter Pro-Q 3
Let’s delve deeper into some of the key features of FabFilter Pro-Q 3 and how they can be used to enhance acoustic recordings:
- Spectrum Analyzer: The spectrum analyzer provides a visual representation of the frequency content of the audio signal. This allows you to quickly identify problem frequencies and make informed EQ decisions.
- EQ Types: Pro-Q 3 offers a wide range of EQ types, including bell, shelf, high-pass, low-pass, and notch filters. Each EQ type has its own unique characteristics and is suited for different applications.
- Dynamic EQ: Dynamic EQ allows you to adjust the EQ settings based on the input signal. This is particularly useful for addressing frequency problems that only occur at certain points in the performance.
- Mid-Side EQ: Mid-side EQ allows you to EQ the mid and side channels of a recording independently. This can be useful for widening or narrowing the stereo image, or for addressing frequency problems that are specific to the mid or side channels.
- Linear Phase Mode: Linear phase mode preserves the phase relationships between different frequencies, which can result in a more natural and transparent sound.
- External Sidechain Input: The external sidechain input allows you to use another audio signal to control the EQ settings. This can be used for creative effects, such as ducking the low frequencies of a bass guitar when the kick drum hits.
- EQ Match: EQ Match allows you to match the EQ curve of one audio signal to another. This can be useful for creating a consistent sonic character across different tracks.
Advantages, Benefits, and Real-World Value of Pro-Q 3
FabFilter Pro-Q 3 offers numerous advantages and benefits for engineers working with acoustic instruments:
- Improved Clarity and Definition: Pro-Q 3’s precise EQ controls allow you to sculpt the frequency response of acoustic instruments with pinpoint accuracy, resulting in improved clarity and definition.
- Reduced Muddiness and Harshness: Pro-Q 3’s dynamic EQ and notch filtering capabilities make it easy to address common problems such as muddiness and harshness.
- Enhanced Stereo Image: Pro-Q 3’s mid-side EQ allows you to widen or narrow the stereo image of acoustic recordings, creating a more immersive listening experience.
- Transparent Sound Quality: Pro-Q 3’s linear phase mode preserves the phase relationships between different frequencies, resulting in a more natural and transparent sound.
- Versatile Tool for Various Applications: Pro-Q 3 is not just for acoustic instruments. It can be used on vocals, drums, and other instruments, making it a versatile tool for any mixing or mastering engineer.
Users consistently report that Pro-Q 3 helps them achieve a more polished and professional sound in their acoustic recordings. Our analysis reveals that Pro-Q 3’s intuitive interface and powerful features make it a valuable asset for any engineer looking to elevate their mixes.
Comprehensive Review of FabFilter Pro-Q 3
FabFilter Pro-Q 3 is widely regarded as one of the best EQ plugins on the market. Its intuitive interface, powerful features, and pristine sound quality make it a favorite among professional engineers. From our experience, Pro-Q 3 excels at both subtle corrective EQ and more drastic creative shaping.
User Experience & Usability: Pro-Q 3’s interface is clean, intuitive, and easy to navigate. The spectrum analyzer provides a visual representation of the frequency content of the audio signal, making it easy to identify problem frequencies. The EQ controls are precise and responsive, allowing you to make subtle adjustments with ease. The plugin also offers a variety of visual feedback options, such as real-time spectrum analysis and gain reduction meters.
Performance & Effectiveness: Pro-Q 3 delivers exceptional performance and effectiveness. Its dynamic EQ and notch filtering capabilities make it easy to address common problems such as muddiness and harshness. The plugin also offers a variety of advanced features, such as mid-side EQ and linear phase mode, which can be used to further enhance the sound quality.
Pros:
- Intuitive and easy-to-use interface
- Powerful dynamic EQ capabilities
- Precise and responsive EQ controls
- Pristine sound quality
- Versatile tool for various applications
Cons/Limitations:
- Relatively high price point compared to some other EQ plugins
- Can be CPU-intensive on older computers
- Steep learning curve for beginners
Ideal User Profile: FabFilter Pro-Q 3 is best suited for experienced engineers who are looking for a powerful and versatile EQ plugin that can deliver exceptional sound quality. It’s also a good choice for beginners who are willing to invest the time to learn its advanced features.
Key Alternatives: Some popular alternatives to FabFilter Pro-Q 3 include iZotope Ozone EQ and Waves SSL E-Channel. Ozone EQ offers a similar feature set to Pro-Q 3, while the SSL E-Channel emulates the sound of a classic analog EQ.
Expert Overall Verdict & Recommendation: FabFilter Pro-Q 3 is a top-tier EQ plugin that offers exceptional performance, versatility, and sound quality. While it may be a bit pricey for some, its advanced features and intuitive interface make it a worthwhile investment for any serious engineer. We highly recommend Pro-Q 3 for anyone looking to elevate their acoustic recordings.
Achieving Sonic Excellence with Acoustic EQ
Mastering advanced acoustic tabs EQ settings is an ongoing journey that requires dedication, practice, and a keen ear. By understanding the fundamental principles of EQ, exploring advanced techniques, and avoiding common mistakes, you can unlock the full potential of your acoustic recordings and achieve pristine, professional-sounding results. The key is to experiment, trust your ears, and always strive for sonic excellence. Remember, the goal is not just to make the instrument sound good in isolation, but to make it sound great in the context of the entire mix.
Share your experiences with advanced acoustic tabs EQ settings in the comments below. What are your favorite techniques and plugins? What challenges have you encountered, and how did you overcome them?
