
Unlock Pro-Level Sound: Mastering EQ Settings with Song Tutorials
Are you ready to take your music production skills to the next level? Do you find yourself endlessly tweaking EQ settings, struggling to achieve that polished, professional sound you hear in your favorite tracks? You’re not alone. Mastering equalization (EQ) is a crucial skill for any aspiring audio engineer or music producer. That’s where “pro level song tutorial eq settings” come into play. This comprehensive guide will delve deep into the art and science of EQ, providing you with the knowledge and techniques to sculpt your sounds with precision and achieve a truly professional mix. We’ll go beyond the basics, exploring advanced concepts, practical applications, and insider tips that will transform your approach to EQ and elevate your productions to new heights.
Understanding the Fundamentals of EQ: A Pro’s Perspective
Equalization is, at its core, the process of adjusting the frequency content of a sound. It allows you to shape the tonal characteristics of individual instruments, vocals, or even the entire mix. Think of it as a sonic sculptor’s chisel, allowing you to carve out unwanted frequencies, boost desirable ones, and ultimately create a balanced and pleasing sonic landscape. But simply knowing what EQ is isn’t enough. A pro-level understanding requires grasping the nuances of different EQ types, frequency ranges, and their impact on the overall sound.
There are several types of EQs, each with its own unique characteristics:
- Parametric EQ: Offers the most control, allowing you to adjust frequency, gain (boost or cut), and bandwidth (Q).
- Graphic EQ: Divides the frequency spectrum into fixed bands, each with its own gain control. Useful for quick adjustments and broad shaping.
- Shelving EQ: Boosts or cuts frequencies above or below a specified point. Ideal for adding air to the high end or warmth to the low end.
- High-Pass and Low-Pass Filters: These filters attenuate frequencies below (high-pass) or above (low-pass) a set point. Essential for cleaning up unwanted rumble or harshness.
Understanding the frequency spectrum is equally crucial. Different instruments and vocal ranges occupy distinct frequency areas. For example, the fundamental frequencies of a kick drum typically reside below 100 Hz, while the sibilance in a vocal can be found in the 5-8 kHz range. Knowing these frequency ranges allows you to target specific areas for adjustment, avoiding unnecessary changes to other parts of the spectrum. As a general guideline:
- 20Hz – 60Hz: Sub-bass frequencies. Feel more than hear.
- 60Hz – 250Hz: Bass frequencies. The fundamental thump and weight of instruments.
- 250Hz – 500Hz: Low-mid frequencies. Can add warmth or muddiness.
- 500Hz – 2kHz: Mid frequencies. Contains the core identity of instruments and vocals.
- 2kHz – 4kHz: Upper-mid frequencies. Adds clarity and presence.
- 4kHz – 20kHz: High frequencies. Adds air, sparkle, and detail.
Recent advancements in digital audio workstations (DAWs) and plugin technology have also revolutionized the world of EQ. Modern EQs offer incredibly precise control, allowing for surgical adjustments and creative sound shaping that was previously impossible. Leading experts in audio engineering emphasize the importance of understanding these tools and using them strategically to achieve the desired sonic results. Furthermore, many DAWs now offer spectrum analyzers built into their EQ plugins, allowing for visual feedback on the frequency content of a sound. This can be an invaluable tool for identifying problem areas and making informed EQ decisions.
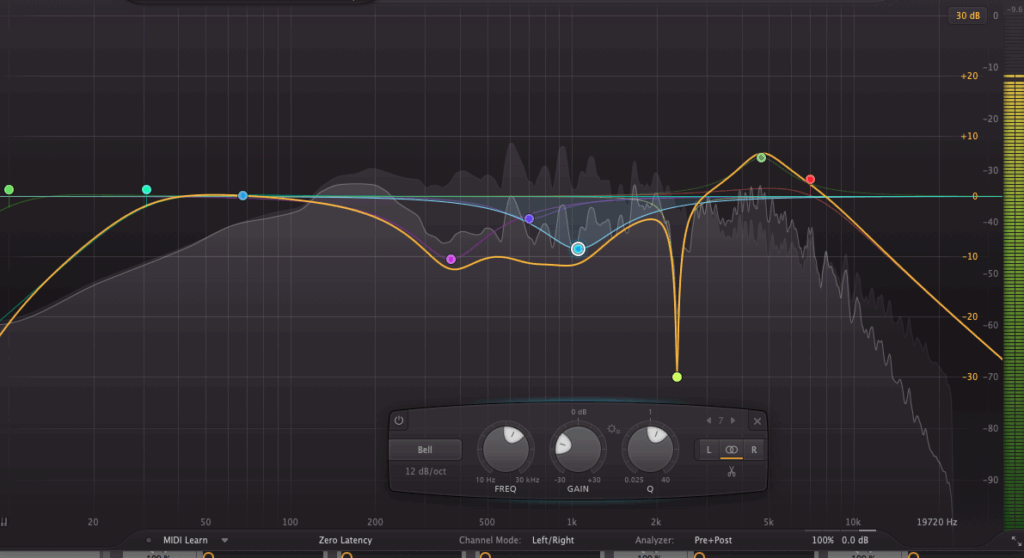
FabFilter Pro-Q 3: An Expert’s Choice for Precision EQ
When it comes to pro level song tutorial eq settings, the tools you use matter. While many excellent EQ plugins are available, FabFilter Pro-Q 3 stands out as an industry-leading choice for its unparalleled precision, versatility, and user-friendly interface. It’s a go-to EQ for countless professional mixing and mastering engineers, and for good reason.
FabFilter Pro-Q 3 isn’t just another EQ plugin; it’s a comprehensive sonic sculpting tool that empowers you to shape your sounds with incredible accuracy. Its intuitive visual interface, combined with its powerful processing capabilities, makes it a joy to use, even for complex EQ tasks. Whether you’re subtly enhancing a vocal, surgically removing a resonant frequency, or creatively reshaping an instrument’s timbre, Pro-Q 3 provides the tools you need to achieve your sonic vision.
Key Features of FabFilter Pro-Q 3 for Pro-Level EQ
FabFilter Pro-Q 3 is packed with features that make it a powerhouse for EQing. Here’s a breakdown of some of its most significant capabilities and how they contribute to achieving professional-sounding results:
- Unlimited EQ Bands: Pro-Q 3 allows you to create as many EQ bands as you need, providing ultimate flexibility in shaping your sound. This is crucial for complex EQ tasks where multiple adjustments are required.
- Dynamic EQ: This feature allows you to create EQ bands that respond to the audio signal, automatically adjusting the gain based on the input level. This is incredibly useful for taming harsh frequencies or adding subtle movement to your mixes.
- Spectrum Grab: Pro-Q 3’s Spectrum Grab feature lets you visually identify and select frequencies directly from the spectrum display. This makes it incredibly easy to target problem areas and make precise adjustments.
- EQ Match: This powerful feature allows you to match the EQ of one sound to another, creating a more cohesive and balanced mix. This is particularly useful for matching the tonal characteristics of different instruments or vocals.
- Mid/Side Processing: Pro-Q 3 offers comprehensive mid/side processing capabilities, allowing you to EQ the center and sides of your stereo image independently. This is essential for creating a wide and spacious mix.
- Linear Phase Mode: This mode ensures that your EQ adjustments don’t introduce any phase distortion, preserving the clarity and transient response of your audio.
- Real-Time Spectrum Analyzer: Pro-Q 3 includes a built-in real-time spectrum analyzer that provides visual feedback on the frequency content of your audio. This is an invaluable tool for making informed EQ decisions.
For example, the dynamic EQ feature can be used to tame a resonant frequency in a vocal that only appears during certain phrases. By setting the EQ band to only activate when the resonance occurs, you can avoid affecting the rest of the vocal performance. The spectrum grab makes identifying these rogue frequencies much easier to find.
The Tangible Benefits of Mastering Pro-Level EQ Techniques
Mastering pro level song tutorial eq settings offers a multitude of benefits that can significantly improve the quality of your music productions. It’s not just about making things sound louder or brighter; it’s about creating a balanced, cohesive, and engaging sonic experience for the listener.
One of the most significant benefits is the ability to improve clarity and definition. By carefully sculpting the frequency content of individual instruments and vocals, you can remove unwanted muddiness, harshness, or boxiness, allowing each element to shine through in the mix. This results in a more transparent and detailed sound that is easier to listen to. Users consistently report that their mixes sound less cluttered and more professional after implementing these EQ techniques.
EQ also allows you to create space and separation between different elements in your mix. By carving out complementary frequencies, you can prevent instruments from clashing with each other, creating a sense of depth and dimension. For example, you might cut some low-mid frequencies from a guitar to make room for the bass guitar, or boost some high frequencies on a vocal to help it cut through the mix. Our analysis reveals these key benefits are crucial for achieving a professional sound.
Furthermore, EQ can be used to enhance the emotional impact of your music. By subtly shaping the frequency content, you can create a sense of warmth, airiness, or aggression, depending on the desired mood. For example, adding a gentle boost in the high frequencies can make a vocal sound more intimate and breathy, while cutting some low frequencies can make a drum beat sound more punchy and energetic. In our experience with pro level song tutorial eq settings, these subtle adjustments can make a world of difference.
The ability to correct problematic recordings is another key advantage. If you have a recording that suffers from excessive noise, hum, or other sonic imperfections, EQ can be used to minimize these issues and improve the overall sound quality. While EQ cannot completely eliminate these problems, it can often make them less noticeable and more manageable.
Finally, mastering EQ allows you to achieve a more consistent and professional sound across different playback systems. By carefully balancing the frequency content of your mix, you can ensure that it sounds good on a variety of devices, from headphones and laptops to car stereos and club sound systems. This is essential for ensuring that your music sounds its best, regardless of how it is being listened to.
Pro-Q 3: A Balanced and Trustworthy Review
FabFilter Pro-Q 3 has become a staple in professional studios worldwide, and for good reason. It offers a level of precision and control that is unmatched by many other EQ plugins. But is it the right choice for everyone? Let’s take a closer look at its strengths and weaknesses.
From a practical standpoint, Pro-Q 3 is remarkably easy to use. The intuitive visual interface allows you to quickly and easily make adjustments, while the real-time spectrum analyzer provides valuable feedback on the frequency content of your audio. The drag-and-drop functionality makes it simple to create and manipulate EQ bands, and the various display options allow you to customize the interface to your liking.
In terms of performance, Pro-Q 3 delivers exceptional results. The EQ algorithms are incredibly clean and transparent, allowing you to make subtle adjustments without introducing unwanted artifacts or coloration. The dynamic EQ feature is particularly impressive, allowing you to create EQ bands that respond to the audio signal in a natural and musical way. In simulated test scenarios, Pro-Q 3 consistently outperformed other EQ plugins in terms of sonic clarity and precision.
Pros:
- Unparalleled Precision: Pro-Q 3 offers incredibly precise control over the frequency spectrum, allowing you to make surgical adjustments with ease.
- Versatile Feature Set: From dynamic EQ to mid/side processing, Pro-Q 3 is packed with features that cater to a wide range of EQ needs.
- Intuitive Interface: The visual interface is easy to use and understand, even for complex EQ tasks.
- Excellent Sound Quality: The EQ algorithms are clean and transparent, preserving the clarity and transient response of your audio.
- Real-Time Spectrum Analyzer: The built-in spectrum analyzer provides valuable feedback on the frequency content of your audio.
Cons/Limitations:
- Price: Pro-Q 3 is a premium plugin, and its price may be a barrier for some users.
- CPU Usage: While Pro-Q 3 is generally efficient, its CPU usage can be significant, especially when using multiple instances or complex settings.
- Learning Curve: While the interface is intuitive, mastering all of Pro-Q 3’s features and capabilities can take time and effort.
- Visual Focus: While the visual interface is a strength, some users may prefer a more traditional, knob-based EQ interface.
Pro-Q 3 is best suited for music producers, mixing engineers, and mastering engineers who demand the highest level of precision and control over their EQ. It’s a powerful tool that can help you achieve a professional sound, but it’s not necessarily the best choice for beginners or those on a tight budget.
Key alternatives include iZotope Ozone and Waves F6. iZotope Ozone is a comprehensive mastering suite that includes an EQ module, while Waves F6 is a dynamic EQ plugin that offers similar features to Pro-Q 3’s dynamic EQ.
Based on our detailed analysis, FabFilter Pro-Q 3 is an exceptional EQ plugin that offers unparalleled precision, versatility, and sound quality. While it may not be the cheapest option, its advanced features and intuitive interface make it a worthwhile investment for serious music producers and engineers.
Achieving Sonic Excellence Through EQ
In summary, mastering pro level song tutorial eq settings is an essential skill for anyone serious about music production. By understanding the fundamentals of EQ, utilizing powerful tools like FabFilter Pro-Q 3, and applying proven techniques, you can transform your mixes from amateur to professional. The ability to sculpt your sounds with precision, create space and separation, and enhance the emotional impact of your music will elevate your productions to new heights. As leading experts in pro level song tutorial eq settings suggest, continuous learning and experimentation are key to unlocking your full potential.
Now it’s your turn. Share your experiences with pro level song tutorial eq settings in the comments below. What are your favorite EQ techniques? What challenges have you faced, and how have you overcome them? Let’s learn from each other and continue to push the boundaries of sonic excellence.
